Release Features – New Build
From now on, after every release we will aim to highlight the new features that have been created within MWF – our flagship wood and steel framing software. This way you can stay up-to-date on what’s new and improved within our various software.
Here’s what we’ve launched this release (be warned it’s a long one…our team was hard at work!):
Before starting, please note:
1. This will be the last 2017 release
2. When in a work sharing environment, it is imperative that users be on different worksets.
3. The whole family package has been updated
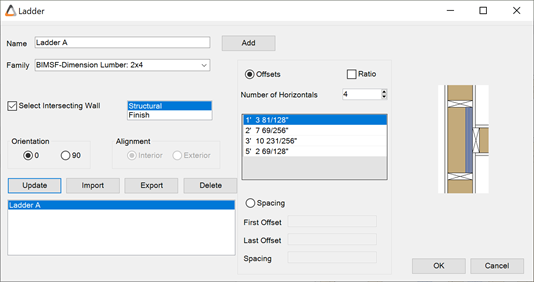
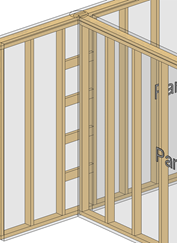
1. Place Ladder Joins
Now when a connecting wall falls in between two wood studs in a T intersection, the Place Ladder Join will allow for the placement of horizontal members in a panel connecting to the intersecting wall. This option is available under the Tools menu in MWF Pro Wood and MWF Pro Suite.
2. Line Based Blocking/ Backing
A visual and powerful tool which allows users to insert blocking and backing into panels (to be used together with Markers Lines). This tool is available in all versions of MWF under the Edits menu. The configuration can also be opened directly from Create Marker Lines within the Markers menu.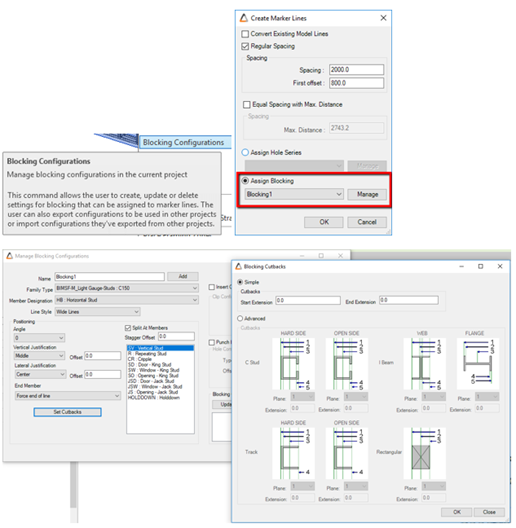
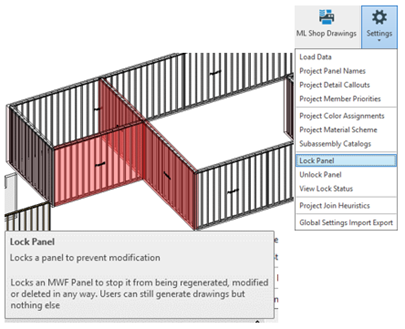
3. Lock Panel
This new command gives users the ability to mark a panel as “locked” in the project. When locked, a panel can’t be regenerated, deleted or have any changes applied to it. Shop Drawings can still be created from a Locked Panel and Locked Panels are visually identified in all views. This tool is available for all MWF products under the Settings menu.
4. Insert strapping on top and bottom track after CNC hole generation for in wall MEP clash
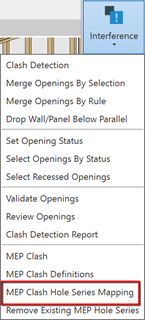
Users now have the ability to place coil straps on both sides of an opening in Top and Bottom plates which might have been created as a result of a MEP Clash. You can find this option in MEP Clash Hole Series Mapping under the Interference tab. Available for all products but mainly used in wood.
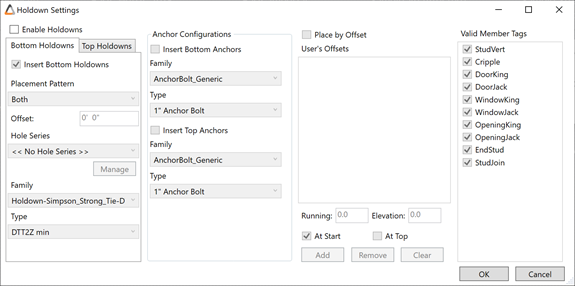
5. Insertion of holdowns with hole for threaded rod at top and bottom of panel
Users now have the ability to moveadddelete the associated anchor and save the move with regeneration, as well as the associated hole series. Ability to regenerate associated hole series. Part of template creation in “Panel Properties”. Available in Pro Wood and Pro Suite.
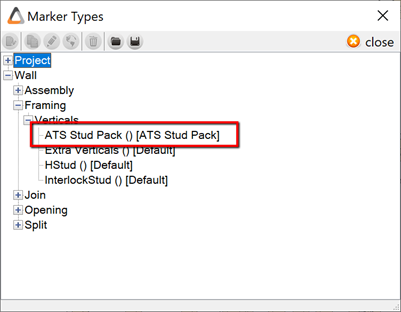
6. ATS Stud Pack
An ATS Stud Pack is a special framing condition which has vertical rods going through multiple walls, has a specific framing requirements around the rod and in the top panel where the rod ends. This specialty framing marker is assigned to a marker line which is hosted to the walls. Available for all products but mainly used in wood.
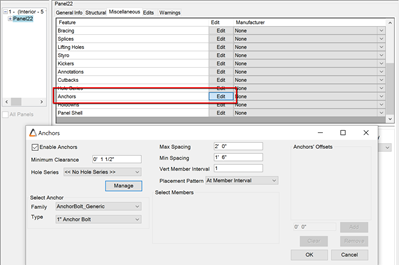
7. Insertion of Anchor bolts
In this new release, anchor bolts are now part of the panel’s template (not a post-processing operation), and as such will survive regeneration. Furthermore, users may apply anchor bolts through the ‘’Holdowns’’ feature as well (please refer to feature 5). Available for all products but mainly used in wood.
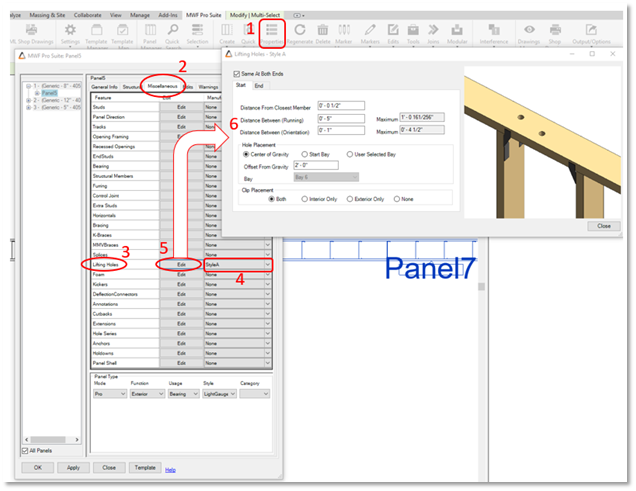
8. Lifting hole and strap placement as per rule sets in panel properties
Lifting Holes are now part of Panels Properties. If they are necessary, steps below can be followed. Available in MWF Pro Wood and MWF Pro Suite.
- Select Panel, or Panels, and go to Properties
- In Miscellaneous tab…
- Go to Lifting Holes
- Choose Style A
- And Edit
- Setup the necessary Lifting Holes and Close
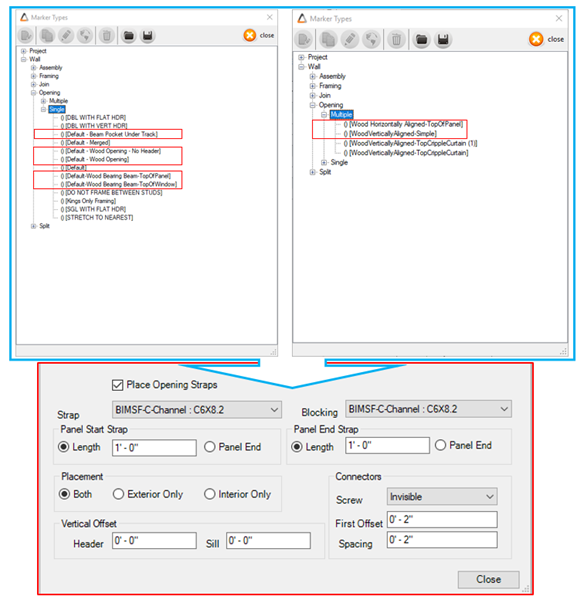
9. Insertion of opening strapping and blocking
Straps can be added Wood Openings marker of the following types: Single and Multiple. In Marker Manager, Edit the opening types shown on the images below and choose Place Opening Straps to enable the settings. Pro Wood and Pro Suite only!
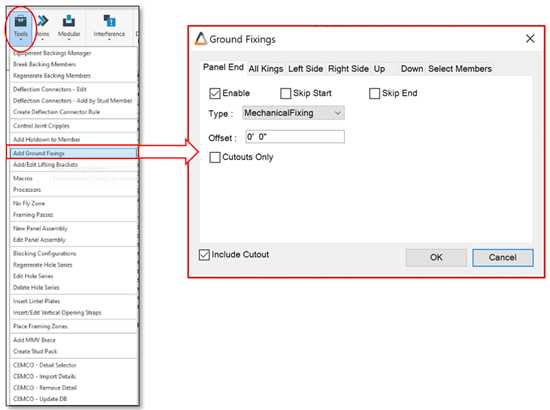
10. Ground Fixings
We added a “Cutouts Only” option to Panel End, All Kings, Down and Select Members. Users can now place Ground Fixings on Selected Panels. But if the panel already has ground fixings, they will be removed. Available in MWF Pro Metal and MWF Advanced Metal.
11. Implementation of the Booster
After opening Panels Properties for the second time, Panel Management will operate much faster. Available in all MWF products.
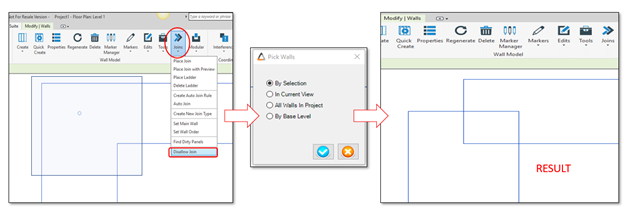
12. Renamed the command “Disjoin Walls” to “Disallow Join” and moved it to Joins Menu
This tool can be used to disjoin all the desired selected wall joins. Available in all MWF products.
13. Proximity Grouping Revamp
Improvements have been made in order to create a more robust tool for Shop Drawing Proximity Grouping for members labels. When a panel member is beside or very close to another one, the Proximity Grouping logic will automatically be applied to avoid text label overlapping. These improvements have been done within Shop Drawings for MultiLayer walls, Standard walls and Floors V1 and V2.
Users now have the ability to:
- Align members to the outside of end studs and tracks.
- Align opening members to the inside of openings.
- Apply text orientation to vertical members only.
- Combine opening members (ex ‘C0 + C1(2)’).
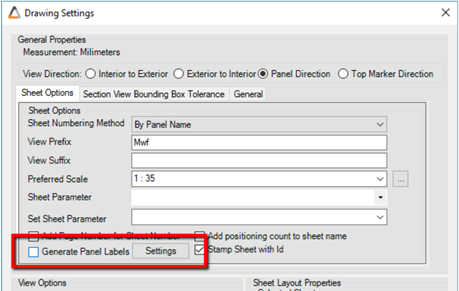
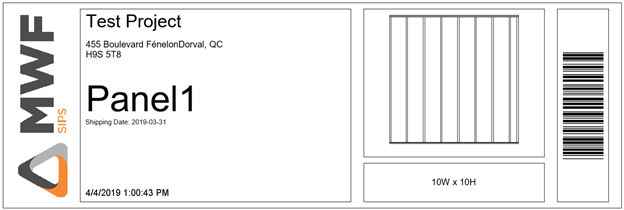
14. Shop Drawing Label Generation
When using this tool, the user can generate a new drawing sheet with a panel shop drawing. This extra ‘label’ sheet will contain information about the panel and include a barcode which can be used during the manufacturing process of a panel. Available in all products.
15. BOM Auto Data Population
In previous versions, in order to populate the BOM with the required fields, the user needed to select the members of the panel before editing or creating the BOM within the drawing settings. This new feature now allows for the creation of schedule options without having to select a member before bringing up the drawing’s manager. Available in all MWF products.
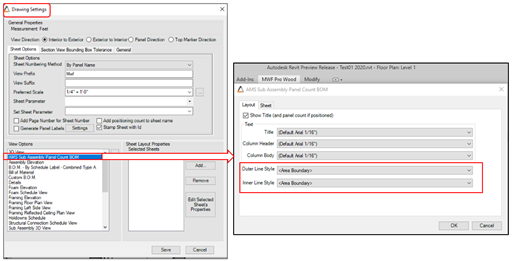
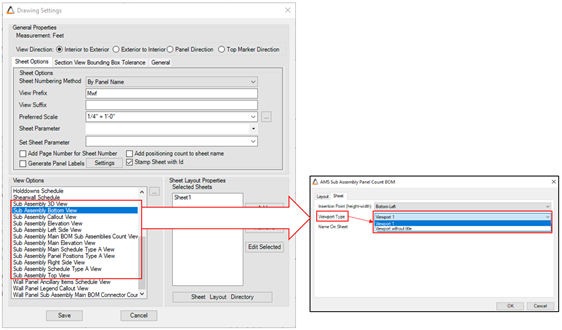
16. Sub Assembly Drawings Improvements
We have simplified adding of sub assemblies to Shop Drawings. We have adding two layout options to the ‘’AMS Sub Assembly Panel Count BOM’’ view option; ‘’Outer and Inner Line Styles’’. We’ve also added to option to select a viewport type. Available in all MWF products.
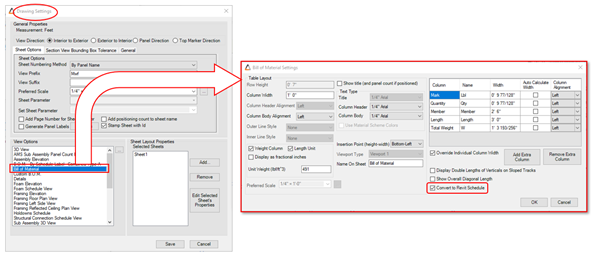
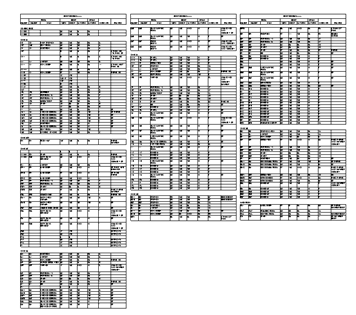
17. Schedule break for converted Bill of Materials
The Bill of Materials drafting view can be divided up and placed similar to schedule views in Revit. Replicate the Bill of Materials as a schedule so that it can be divided easily after it has been placed on the sheet. Available in all MWF products.
Result:
18. Changed shop drawing “Top View” and “Bottom View” to “Floor Plan” and “Reflected Ceiling Plan” with adjustable cut plane and Far Clipping
Floor Shop Drawing Framing Floor and Reflected Ceiling Plan Views can be Cut by Plane and be settled to have a fixed height when necessary. Available in all MWF products.

19. Ability to generate a BOM for MEP as well as dimensioning of MEP
MEP objects that clash with the panel can now not only be shown in the shop drawings, but they can now be dimensioned and quantified in a MEP Bill of Materials. MEP objects can be either live in the current project or be a Revit link. Users have the ability to associate dimension styles to their MEP categories independently of other dimensioning options. Available in ML drawings of all products.
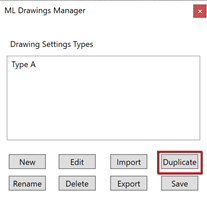
20. Duplication of Drawing Settings for MultiLayer Drawings
This allows the user to duplicate a set of shop drawing settings in order to save time on creating similar shop drawing options. Available in ML drawings of all products.
21. Dimension Type Specifications for Shop Drawings
When producing shop drawings, users can use a combination of continuous and ordinate style dimension strings. (I.E: The top and right end stud dimension strings are required to use a continuous dimension string, whereas, all other areas require the ordinate style.). Available in all products.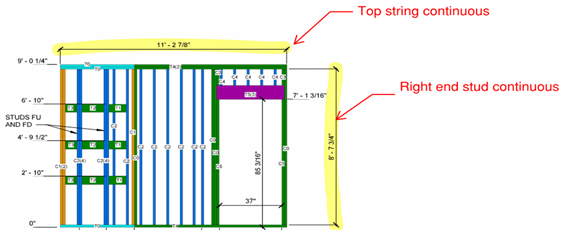
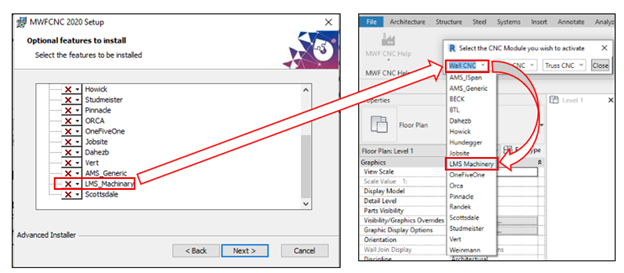
22. CNC Wall for LMS Machinery
LMS Machinery was added to CNC Drop List Options. Available in MWF Pro Metal and MWF Advanced Metal.
23. Floor Hole Series Regeneration 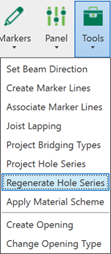
Users now have the ability to regenerate existing hole series without having to regenerate the floor framing. This tool is available for all MWF products within the Floor module, under Tools.
24. Floor panel directional arrow association
When framing odd-shaped floor panels, or multiple small floor panels in close proximity to each other, the “Floor Panel Directional Arrow” would often get placed in a position that would make it difficult to determine which floor panel it belongs to. The “Floor Panel Directional Arrow” and “Floor Panel Label” were modified to include the same information as the “Wall Panel Label”, specifically: BIMSF_Container and BIMSF_Description. Available in all products.
To test it out yourself, download the latest version of MWF from your portal page.
Trusses are some of the oldest structural systems in use today. These highly rigid load bearing systems are easily identified by their hallmark triangular shapes. Offsite construction is promising to revolutionize the construction industry, offering solutions to the industry’s long-standing challenges. But what exactly is offsite construction, and how does it differ from traditional methods? With companies finding ways to utilize the construction technologies available to create more sustainable and reliable developments in the construction of a building, it is now Trusses are some of the oldest structural systems in use today. These highly rigid load bearing systems are easily identified by their hallmark triangular shapes. 
5 Frequently Asked Questions About Light Gauge Steel Framing

5 FAQs About Offsite Construction

Offsite Construction and the Need For Automated Digital Solutions

5 Frequently Asked Questions About Truss Design Software


