Strucsoft Wall Module
- Disassemble Wall
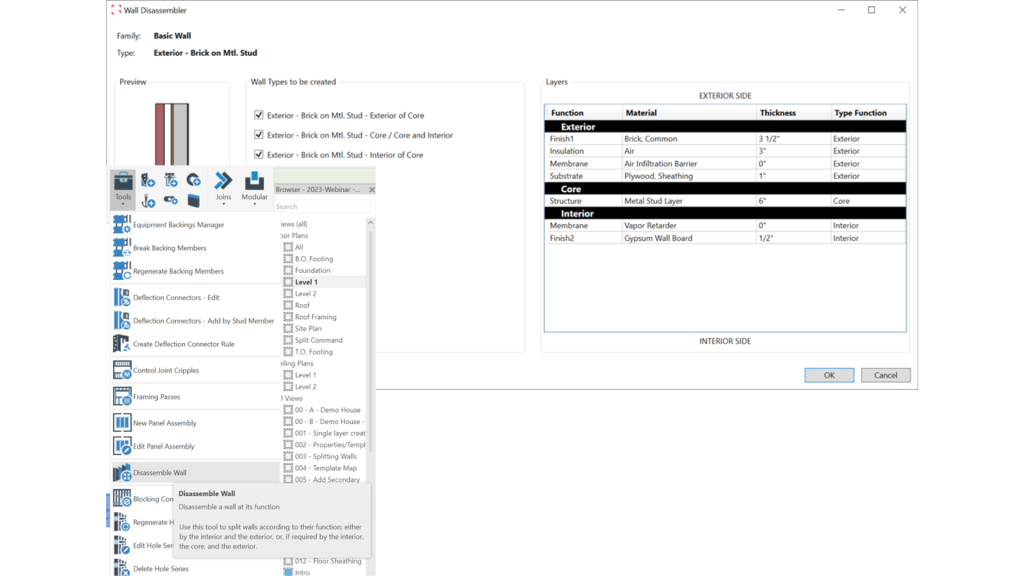
The ability to disassemble a wall at the core layer to create an exterior and interior wall type of the assembly. The new tool will allow users to separate Revit walls according to layer function, providing more flexibility for users to handle the structural layer separately from the Finish/Substrate layers.
- Independent Sheathing
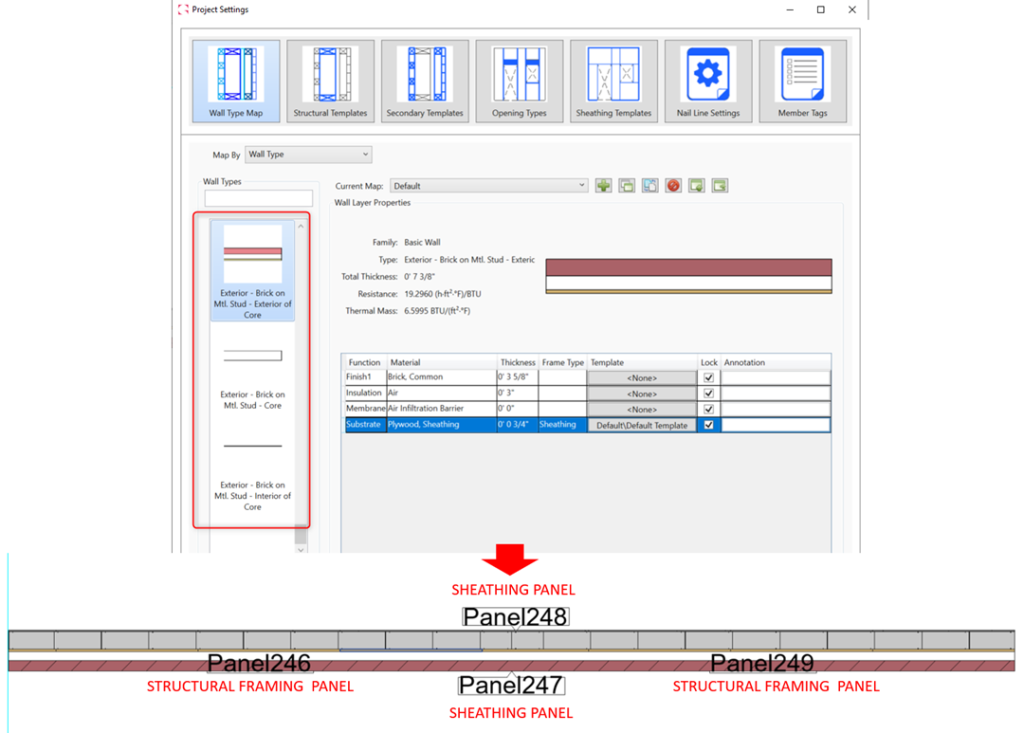
Users can now place sheathing to a facade wall without the requirement of a structural mapped layer. The sheathing boards will still find the structure on the adjoined wall to splice the boards. This option can be used as a complement to the Disassemble Wall tool, allowing users to map layers individually
- Split Horizontal Tool
This new option available in the Markers menu will allow users to split Revit Walls horizontally along selected levels and/or reference planes, allowing for a faster cleanup of the Revit model in preparation for framing. Users will be able to chose between two options: Split at Selected Levels/Reference Planes or Split at Picked Level.
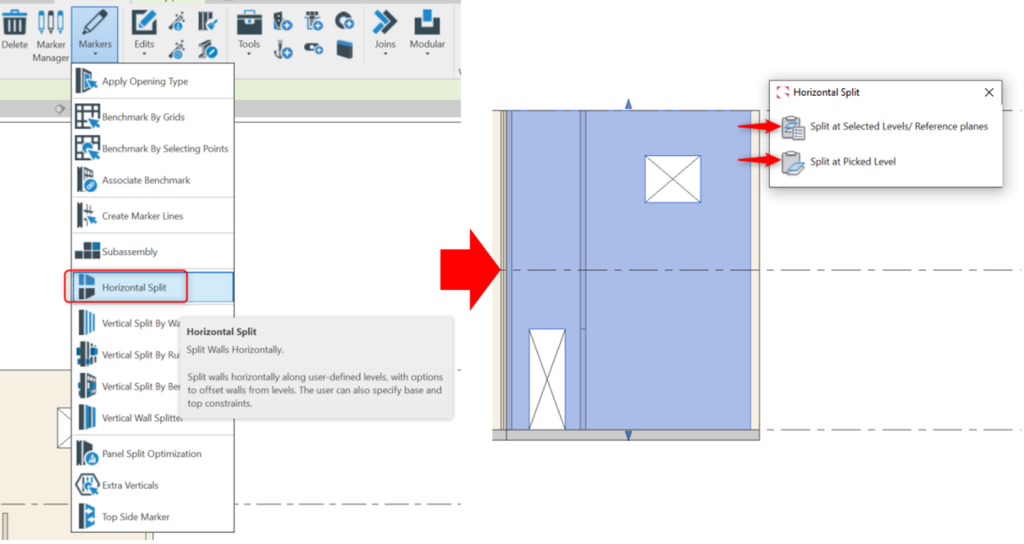
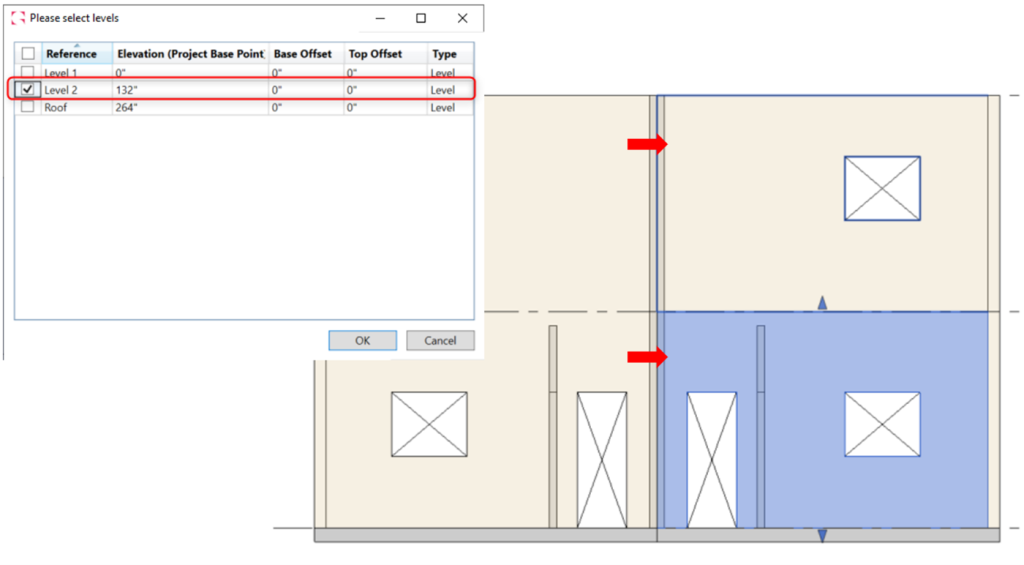
- Split at Selected Levels/Reference Planes:
With this option, users will be able to select existing levels/reference planes from a table to determine where the selected walls should get split. When using this option, it will be also possible to input a Top and/or Bottom Offset to selected levels.
- Split at Selected Levels/Reference Planes:
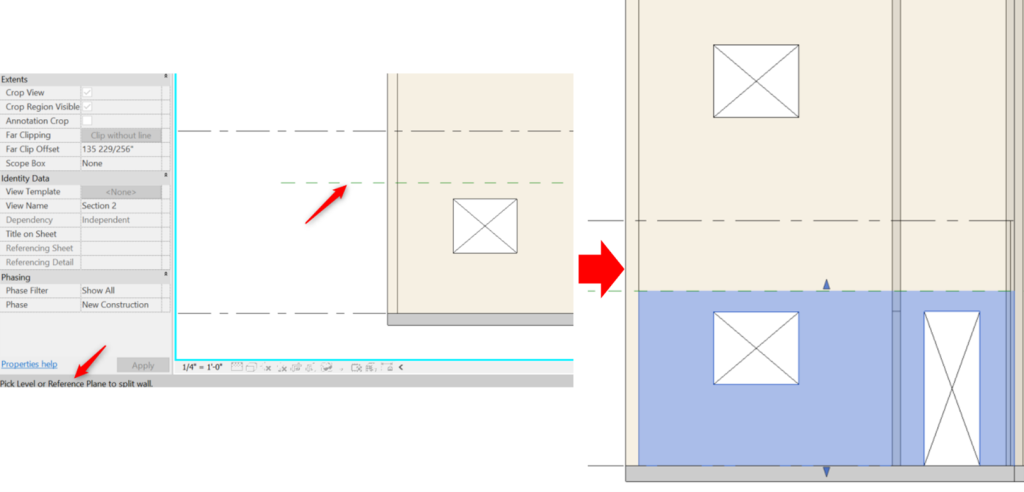
- Split at Picked Levels:
With this option, users will be asked to select the level/reference planes where they would like to split the selected walls using their current Revit view.
- Split at Picked Levels:
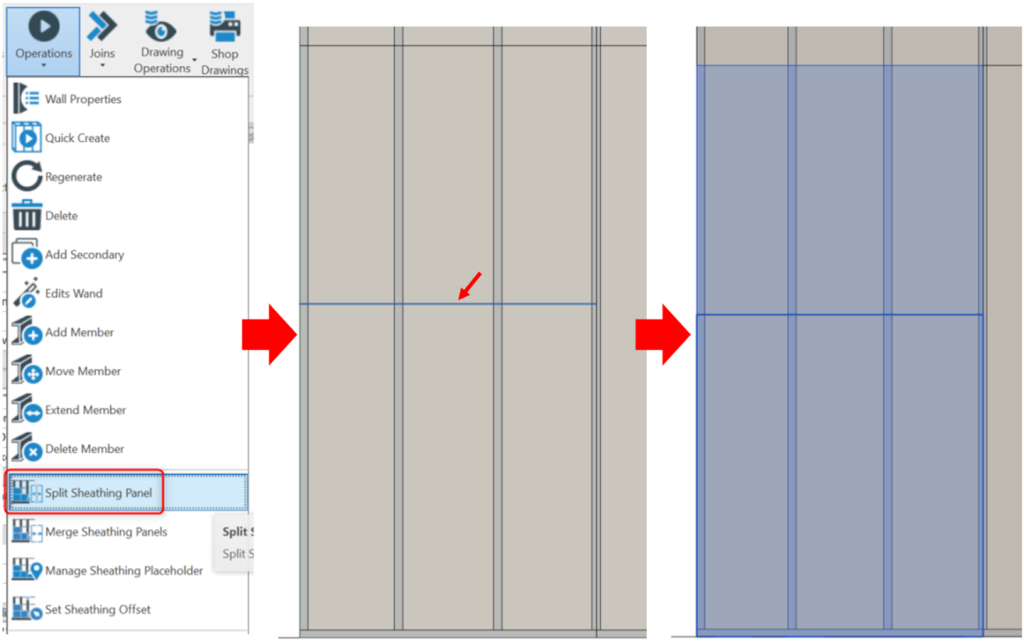
- Split Sheathing Panel
Users can now split individual sheathing panels once the sheathing is populated on a given wall. After splitting the sheathing panels, users can use the edit wand and the newly created layout will survive.
- Control Joint Option for Wood
The Control Joint option is now available in the Wood module.
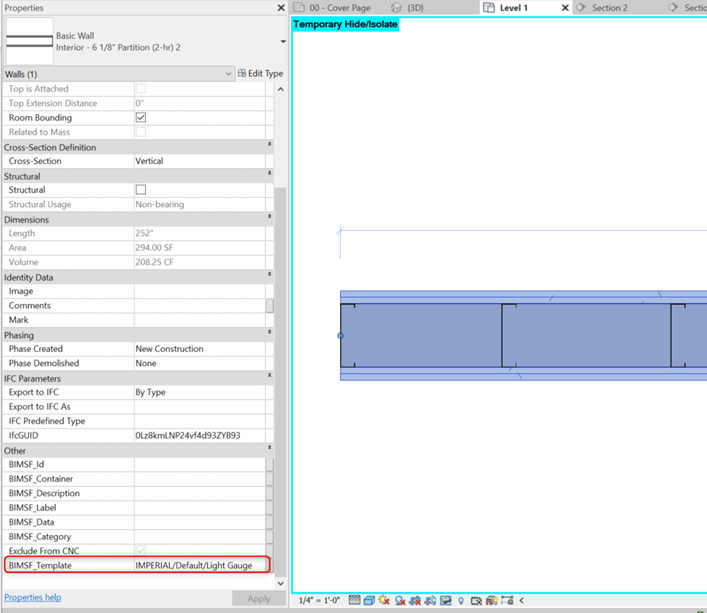
- Template Data
After creating Strucsoft panels, walls will be populated with an instance parameter called BIMSF_Template, allowing users to check what template is being used for a specific panel.
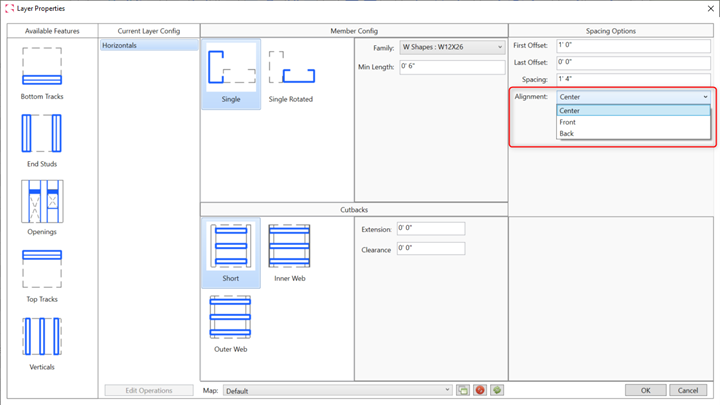
- Alignment option in Secondary Templates Settings
Users can now select a specific alignment in the Secondary Template settings allowing for greater flexibility.
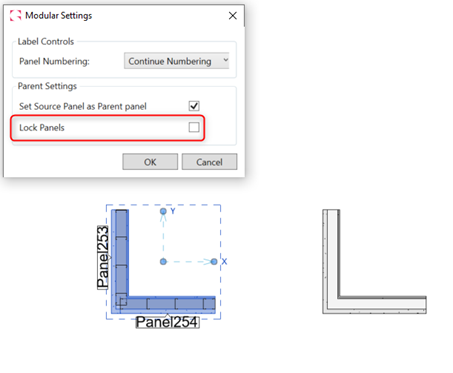
- Modular Tool Lock Panels Option
Users will now be able to determine if they would like to lock or not lock panels when using the Set Source Panel as Parent option (changes apply to Standard and Multilayer Modular tools).
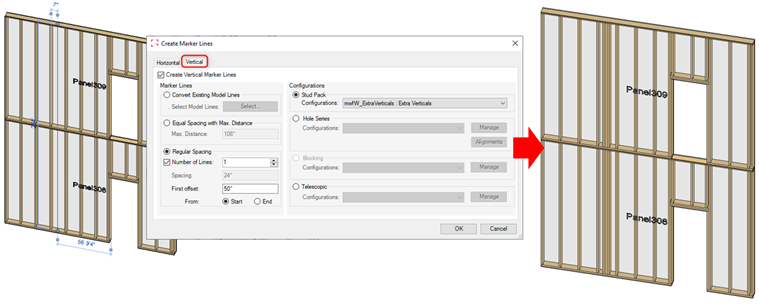
- Vertical Marker Lines Now Recognize Adjacent Panels
Vertical Marker Lines that cross adjacent panels above and/or below are now recognized in those adjacent panels for the placement of stud packs.
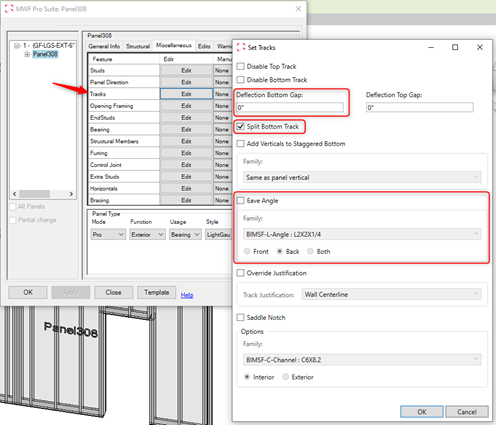
- Eave Angle, Gap And Split Bottom Track Commands Haven Been Migrated To Tracks Tool.
The Eave Angle, Gap and Split Bottom Track commands previously available in the Structural tab are now available in the Tracks command on the Miscellaneous tab.
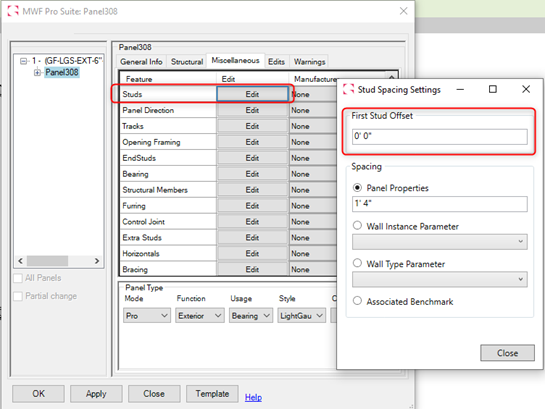
- First Stud Offset Now Available in the Studs Tool
Users can now find the First Stud Offset command within the Studs tool in the Miscellaneous tab.
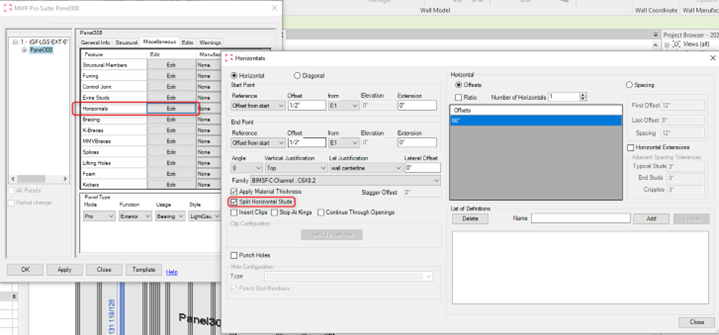
- Split Horizontal Command Now Available In the Horizontals Tool
The Split Horizontal command has been migrated from the Structural Tab to the Horizontals tool in Miscellaneous tab for better coherence.
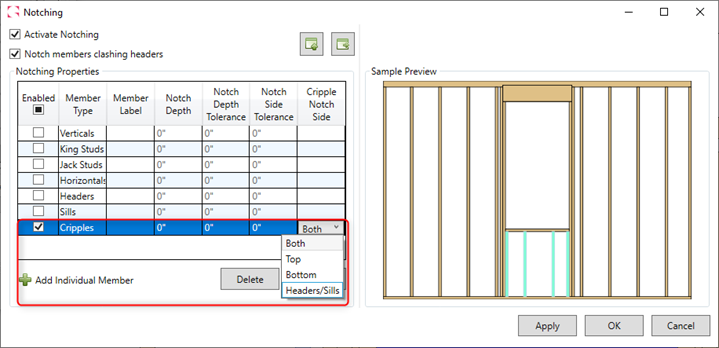
- Notching Tool Improvements
An option has been added that allows a user to notch the vertical header to the top track.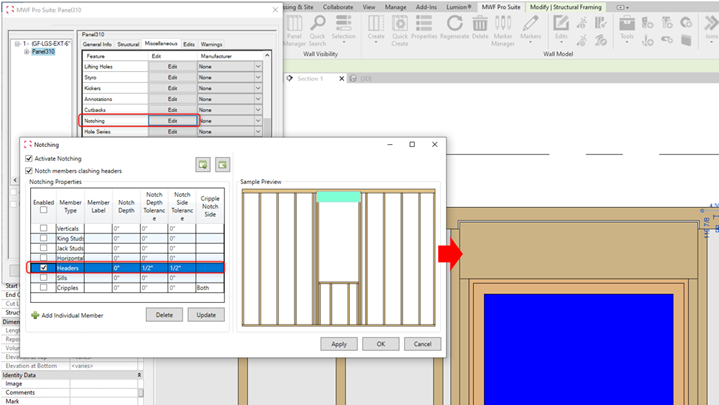
- An option has been added that allows a user to select which member the cripple will notch into – allowing for greater flexibility
- An option has been added that allows a user to select which member the cripple will notch into – allowing for greater flexibility
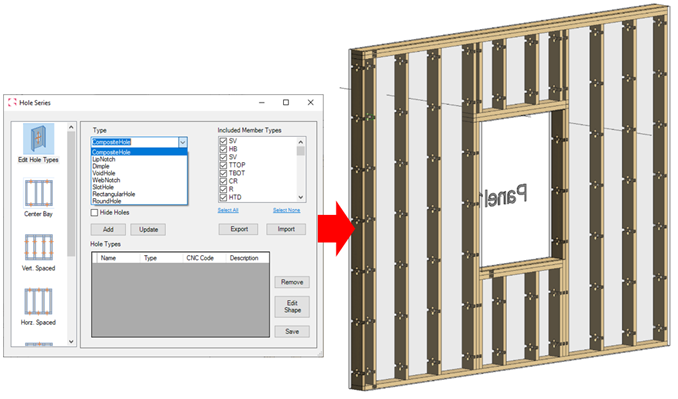
- New “Composite” Hole Type
This new hole type combines a rectangular hole and a slot hole. Users can use this hole type either with the marker lines, or through the panel’s Properties with the desired configuration.
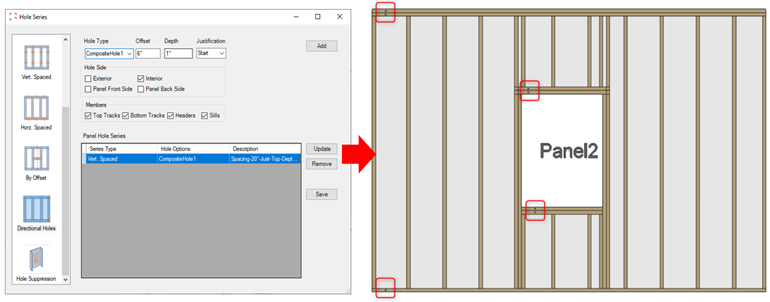
- New Hole Series Configuration – Directional Holes
The new configuration will allow users to add directional and control their placement. Holes can be applied to a specific side of the panel and at specific members (Top, Bottom Tracks. Headers and/or Sills).
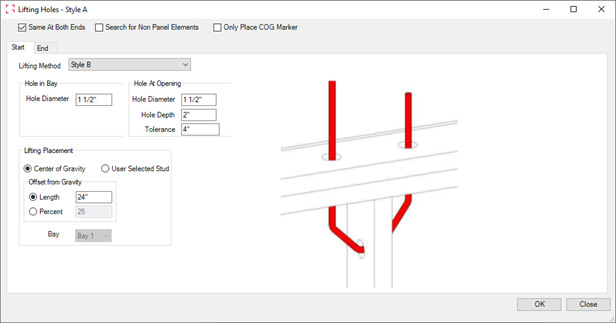
- New Lifting Hole Type
The new option will allow users to modify the hole diameter, depth and lifting placement.
- Updates on Wood Bearing Beam Markers
New options have been added to the Wood Bearing Beam markers, including the ability of settings up Jacks Studs to 0, setting up different family types for Sills and when adding more than one king or Jack, using different family types for each one. Changes made through Edits Wand command will also now be supported by the Markers.

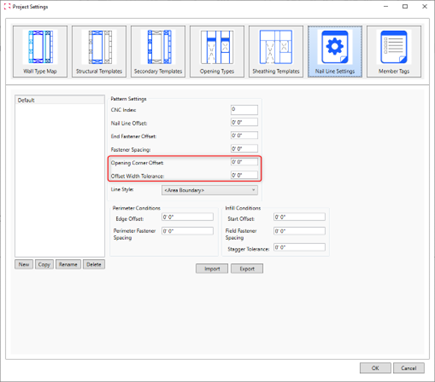
- New Options in Nail Line Settings
Users will be able to set an Opening Corner Offset and an Offset Width Tolerance
Wall Shop Drawings
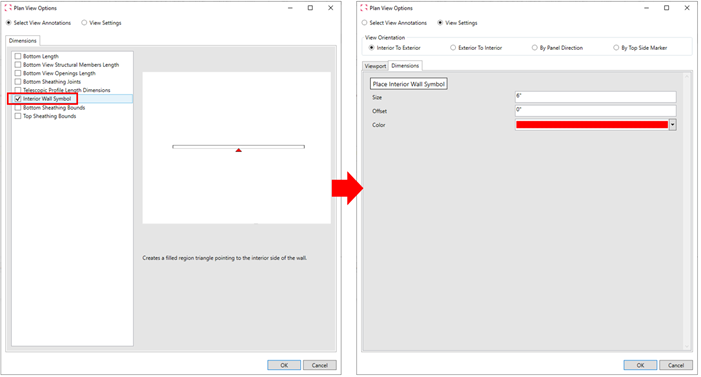
- Option to Add an Indication for the Interior Side of the Wall
This option allows users to distinguish the inside of a panel with a directional arrow, the option has been added to the plan view, the reflected ceiling plan view, and the section side view.
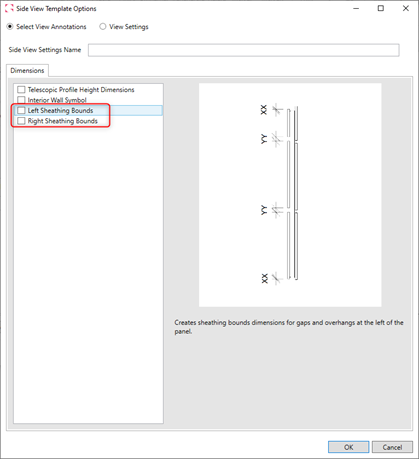
- New Dimensions
- Dimensions for the left and/or right sheathing bounds dimensions have been added to the Section Side view and Elevation View.
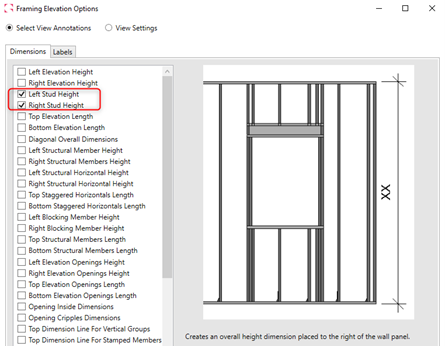
- Dimensions for Stud Length at the right or left of the panel have been added to the Elevation view.
- Dimensions for the left and/or right sheathing bounds dimensions have been added to the Section Side view and Elevation View.
Floor Module
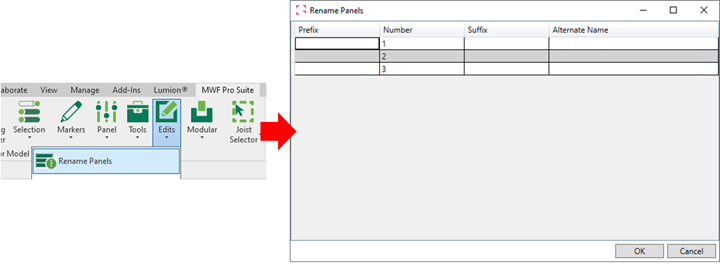
- Rename Panels Command Available for Floor Panels
The Rename Panels command functionality is now available in the Floor Module. Users can now have an excel-type window to rename a collection of floor panels.
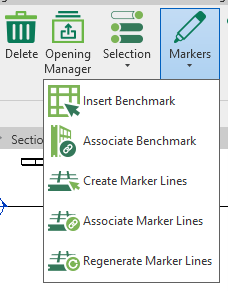
- Marker Lines Command
Marker Lines related options are now available under the “Markers” option for better coherence with the wall Module.
Floor Shop Drawings
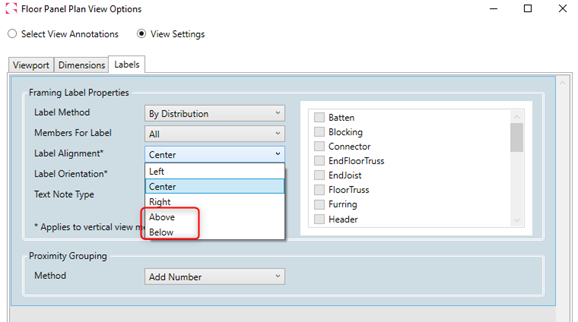
- New Options for Label Placement in Floor Plan View
Users can now place floor labels either “Above” or “Below” the joists for the labelling method in shop drawings, providing better visibility in shop drawings.
Truss Module
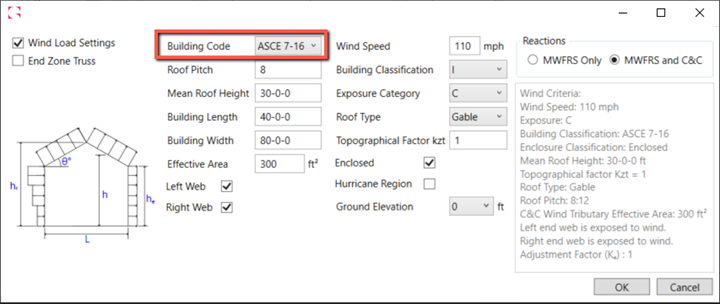
- The Truss Module Now Has the Addition of the ASCE 7-16 Building Code
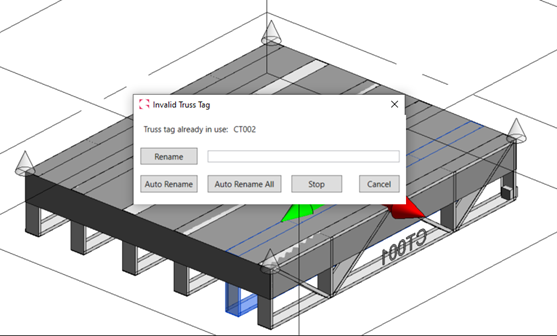
- Rename All Option
A new option to “Auto Rename All” has been added to speed the naming of Trusses; users no longer must auto rename one by one.
Strucsoft Wall Module
- Disassemble Wall
The ability to disassemble a wall at the core layer to create an exterior and interior wall type of the assembly. The new tool will allow users to separate Revit walls according to layer function, providing more flexibility for users to handle the structural layer separately from the Finish/Substrate layers.
- Independent Sheathing
Users can now place sheathing to a facade wall without the requirement of a structural mapped layer. The sheathing boards will still find the structure on the adjoined wall to splice the boards. This option can be used as a complement to the Disassemble Wall tool, allowing users to map layers individually
- Split Horizontal Tool
This new option available in the Markers menu will allow users to split Revit Walls horizontally along selected levels and/or reference planes, allowing for a faster cleanup of the Revit model in preparation for framing. Users will be able to chose between two options: Split at Selected Levels/Reference Planes or Split at Picked Level.
- Split at Selected Levels/Reference Planes:
With this option, users will be able to select existing levels/reference planes from a table to determine where the selected walls should get split. When using this option, it will be also possible to input a Top and/or Bottom Offset to selected levels.
- Split at Selected Levels/Reference Planes:
- Split at Picked Levels:
With this option, users will be asked to select the level/reference planes where they would like to split the selected walls using their current Revit view.
- Split at Picked Levels:
- Split Sheathing Panel
Users can now split individual sheathing panels once the sheathing is populated on a given wall. After splitting the sheathing panels, users can use the edit wand and the newly created layout will survive.
- Control Joint Option for Wood
The Control Joint option is now available in the Wood module.
- Template Data
After creating Strucsoft panels, walls will be populated with an instance parameter called BIMSF_Template, allowing users to check what template is being used for a specific panel.
- Alignment option in Secondary Templates Settings
Users can now select a specific alignment in the Secondary Template settings allowing for greater flexibility.
- Modular Tool Lock Panels Option
Users will now be able to determine if they would like to lock or not lock panels when using the Set Source Panel as Parent option (changes apply to Standard and Multilayer Modular tools).
- Vertical Marker Lines Now Recognize Adjacent Panels
Vertical Marker Lines that cross adjacent panels above and/or below are now recognized in those adjacent panels for the placement of stud packs.
- Eave Angle, Gap And Split Bottom Track Commands Haven Been Migrated To Tracks Tool.
The Eave Angle, Gap and Split Bottom Track commands previously available in the Structural tab are now available in the Tracks command on the Miscellaneous tab.
- First Stud Offset Now Available in the Studs Tool
Users can now find the First Stud Offset command within the Studs tool in the Miscellaneous tab.
- Split Horizontal Command Now Available In the Horizontals Tool
The Split Horizontal command has been migrated from the Structural Tab to the Horizontals tool in Miscellaneous tab for better coherence.
- Notching Tool Improvements
An option has been added that allows a user to notch the vertical header to the top track.- An option has been added that allows a user to select which member the cripple will notch into – allowing for greater flexibility
- An option has been added that allows a user to select which member the cripple will notch into – allowing for greater flexibility
- New “Composite” Hole Type
This new hole type combines a rectangular hole and a slot hole. Users can use this hole type either with the marker lines, or through the panel’s Properties with the desired configuration.
- New Hole Series Configuration – Directional Holes
The new configuration will allow users to add directional and control their placement. Holes can be applied to a specific side of the panel and at specific members (Top, Bottom Tracks. Headers and/or Sills).
- New Lifting Hole Type
The new option will allow users to modify the hole diameter, depth and lifting placement.
- Updates on Wood Bearing Beam Markers
New options have been added to the Wood Bearing Beam markers, including the ability of settings up Jacks Studs to 0, setting up different family types for Sills and when adding more than one king or Jack, using different family types for each one. Changes made through Edits Wand command will also now be supported by the Markers.
- New Options in Nail Line Settings
Users will be able to set an Opening Corner Offset and an Offset Width Tolerance
Wall Shop Drawings
- Option to Add an Indication for the Interior Side of the Wall
This option allows users to distinguish the inside of a panel with a directional arrow, the option has been added to the plan view, the reflected ceiling plan view, and the section side view.
- New Dimensions
- Dimensions for the left and/or right sheathing bounds dimensions have been added to the Section Side view and Elevation View.
- Dimensions for Stud Length at the right or left of the panel have been added to the Elevation view.
- Dimensions for the left and/or right sheathing bounds dimensions have been added to the Section Side view and Elevation View.
Floor Module
- Rename Panels Command Available for Floor Panels
The Rename Panels command functionality is now available in the Floor Module. Users can now have an excel-type window to rename a collection of floor panels.
- Marker Lines Command
Marker Lines related options are now available under the “Markers” option for better coherence with the wall Module.
Floor Shop Drawings
- New Options for Label Placement in Floor Plan View
Users can now place floor labels either “Above” or “Below” the joists for the labelling method in shop drawings, providing better visibility in shop drawings.
Truss Module
- The Truss Module Now Has the Addition of the ASCE 7-16 Building Code
- Rename All Option
A new option to “Auto Rename All” has been added to speed the naming of Trusses; users no longer must auto rename one by one.