Master Framing Visibility options in Strucsoft & Revit
Date
Duration
Speaker

Steve Crow
Technical Solutions Specialist
Watch the recording
What’s the webinar about?
Master project visibility in Revit by combining Revit’s native settings with the enhanced functionality of Strucsoft’s built-in tools. This webinar will guide you through best practices for visibility control, starting with Revit’s visibility settings and view templates to standardize and streamline views across projects. Building on this foundation, we’ll dive into Strucsoft’s advanced selection and visibility options, designed to help you efficiently manage complex framing elements within the Revit environment. By the end of this session, you’ll be equipped to enhance the clarity of your designs, maintain organized views, and achieve seamless collaboration across multidisciplinary teams.
What you’ll learn
- Make hidden framing visible in Revit views
- Ensure consistent views across your project
- Use underlays and view cropping for smarter framing decisions
- Efficiently frame selected walls with Quick Create
Read the full video transcript
Hello everyone, and welcome to this short webinar: Mastering Visibility in Strucsoft (formerly MWF) and Revit.
We’re running several of these short webinars over the coming months, so if you’re interested, get yourself registered. To see when they’re on, scan the QR code on the screen or click it to bring up the calendar of upcoming events. All these webinars are recorded, so if you register, you can go back and watch historical ones, re-watch them, or catch up if you miss any.
My name is Steve Crowe, and I’m an Application Specialist with the Graitec Group. I handle training, support, implementation, CAD standards, on-site setup, and more for various software. I joined the Graitec Group back in January 1989—that’s 36 years next month; time just flies. My current role involves training and support for AutoCAD (which has been around for donkey’s years), Revit, and I’ve recently taken on Strucsoft (formerly MWF), the metal and wood framing tool that works in conjunction with Revit. It all integrates hand-in-hand with your Revit projects.
In my spare time, I enjoy getting out on my motorbike blasting around the Yorkshire Dales or the North York Moors—I’m based in the UK. I also love paragliding, floating around the skies, DIY around the house (or DIY: destroy it yourself, as they say), and beekeeping—I currently have about 10 hives in the garden. Nothing beats getting out hiking in the hills with my lad; here’s a picture of us at the top of Ben Nevis in Scotland, the highest point in the UK, back at Easter 2024 (hoping to do it again in 2025). It was chilly up there—sunny but with wind chill making it feel like minus seven or minus ten—quite parky on the tops.
Today, we’re focusing on Strucsoft (formerly MWF) and Revit: controlling the display. We’ll look at common issues you may encounter when setting up your Revit model to display Strucsoft framing or just parts of the model itself, along with workarounds and resolutions. The goal is to set up views so you can see what you need—anything unnecessary turned off or cropped out—and place those views onto sheets. We’ll cover controlling display, selection tools in Revit and Strucsoft to make selecting objects, panels, members, and so on easier for editing and display control. At the end, we’ll have a Q&A session. If you’re watching live, ask questions then. If it’s a recording, send me an email—my address is on screen (take a picture if needed). If I can’t answer right away, someone else on the team will.
Let’s jump into Revit. Here’s a model that may have been sent to you or worked on by a colleague—some framing is already done. The 3D view shows the issue: Strucsoft timber or steel framing goes inside walls, so all your hard work is hidden behind plasterboard, brickwork, or similar. We need to see inside the walls.
Switch to a floor plan. Colleagues have done some framing here and asked to finish it off—but you can’t see any framing. Various factors control whether framing displays, one being detail level. In this view with washbasins, red/green/blue circles indicate connections (hot/cold/waste) but not actual pipework. Changing from Coarse to Medium detail level reveals C-sections inside walls—some walls are framed, others aren’t.
Pipework still shows schematically, and there’s ductwork (likely above a suspended ceiling). Walls may extend past the ceiling, requiring openings for ducts. Another key feature is View Range (type VR or access via Properties → View Range). The diagram shows the primary range from floor (zero offset) up to the underside of the suspended ceiling. Increasing the top offset to 1 meter reveals the ceiling void, ductwork, and associated pipework from the air handling unit.
Detail level affects display: Coarse shows schematic ductwork; Medium shows it properly; Fine shows pipework with connections and true sizes. Now we can account for openings through walls above the ceiling. The same applies below—a suspended timber floor with waste pipes may require openings in paneling.
View Depth (in View Range) can reveal items below, like waste pipes from sinks through the corridor (e.g., set to -750 mm).
To apply consistent settings (View Range, pipework/duct visibility, detail level, etc.) across floors, create a View Template. It captures view settings—what’s on/off, cut plane, detail level, etc. Right-click the view in the Project Browser → Create View Template from this View (name it, e.g., “Pipes and Ducts Showing”). It prompts to include options—tick what you want. Apply to another view via right-click → Apply Template or View tab → View Templates → Apply. This ensures consistency across views on a sheet.
Underlays help determine framing. On Floor 2, zoom in—framing may need extra support based on Floor 1 (e.g., big double doors in the corridor below). In Properties, set Underlay to Floor 1 (not necessarily the level below—any level works, like roof gear affecting below). This shows downstairs doors/foyer, which may impact framing above.
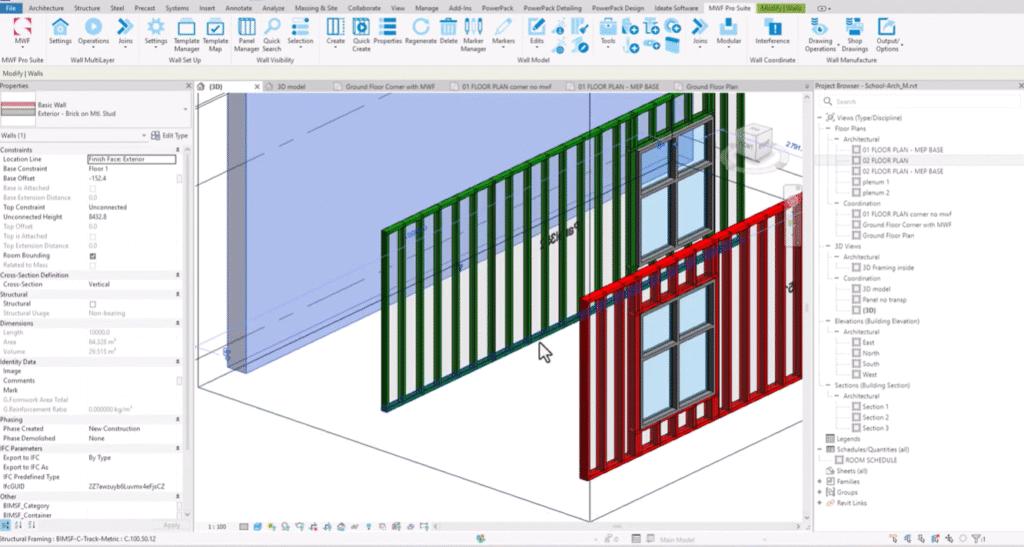
A go-to tool in Revit with Strucsoft is the Section Box (type BX or Modify ribbon → Section Box). Select items (e.g., walls outside the building), create the Section Box around them. Framing inside walls is hidden by solid walls. To see inside, make walls transparent: select a wall → right-click → Override Graphics in View by Element → set Transparency to 80%. Now frame with Quick Create (via Strucsoft)—framing appears visible through the wall (e.g., C-sections over window heads, orientations clear).
Override by category (Visibility/Graphics, shortcut VV) for all walls (interior/exterior) at 80% transparency. Or select individually for internal framed walls only.
Quick Create only frames walls with template matches—no match (e.g., no template for that wall type) shows “No panels could be created” or “No template match found.” This lets you window-select the project—it only frames required walls (won’t touch externals if unmapped).
Framing may color-code (e.g., red/green) based on member size (hover shows C100x50x12 vs. C150x50x12). This uses Settings → Project Material Scheme (under Strucsoft)—color by section size, gauge, etc. In 3D views, isolate framing to see heavier (red) vs. lighter sections.
For door heads: Cut plane (in View Range) at 1200 mm cuts through doors (e.g., 2134 mm high). Lower to 500 mm to see section orientations above. Create a View Template (“Door Heads”) and apply for consistency. Pull views onto sheets as needed.
To frame unframed walls in an area: Turn on crop view, adjust boundary to contain only those walls. Select all → Filter to walls only → but this includes externals (may error on unmapped). Better: select sample walls (Ctrl for multiples, different thicknesses) → right-click → Select All Instances → Visible in View (crops to view). Then Quick Create frames only those (e.g., 20 walls). It uses maps/templates accordingly—color-coded too. Framing locks to templates (updates if template changes); unlock for custom panels.
There are loads more tools, but that’s the time. If you have questions (live or later), fire them over or email me. Register for upcoming webinars to improve skills in Revit and Strucsoft. Thanks very much, everybody—enjoy the rest of your day. If any issues or queries, drop me an email. Have a good day—thank you, bye!
Some of our international clients that use our software


