Modular Tools for Offsite Builders
Date
Duration
Speaker

Genevieve Parent
Technical Solution Specialist
Watch the recording
What’s the webinar about?
Join us for Modular Tools for Offsite Builders and discover the power of Strucsoft’s new Built-Up Custom Configurator—designed to streamline framing workflows for modular and offsite construction. Learn how to create, customize, and reuse complex built-up sections like headers, sills, jambs, and stud packs across projects. We’ll walk through real-world use cases and live demos, showing how this tool boosts efficiency, accuracy, and flexibility. Now available for Revit 2023, 2024, and 2025. Don’t miss it!
What you’ll learn
- How to prepare Revit models correctly for modular workflows using Strucsoft’s Modular module
- Best practices for creating, managing, and copying parent/child module groups for efficient offsite construction
- How to use template maps, auto‑joins, and framing tools to streamline wood and steel modular framing
- Methods to update, regenerate, and synchronize framing properties across identical modules to save time and reduce errors
Read the full video transcript
Hello, everyone, and welcome to today’s webinar, Modular Tools for Offsite Builders.
This webinar is brought to you by Graitec.
My name is Clemence, and I’m pleased to be your moderator today.
You can find a schedule of upcoming events, webinars, and training at our calendar at IASTI/calendar, so make sure to check that.
Before we dive in, we’d love to learn more about how we can support you in your business.
So if you could take a moment to answer the poll question on the right side of your screen, it would help us so much to learn how we can better serve you.
We’d also like to invite you to check out our free trial for Strucsoft and our customized training and services.
So you can scan the QR code on the screen, so I will leave you a bit of time to scan it.
Please, during the presentation, feel free to drop your questions as they come to mind in the live chat.
We will have time to answer them at the end.
And we are very excited to welcome Genevieve Parent as our featured speaker today.
Genevieve is a skilled drafting technician with deep expertise in Revit, MWF, ProWood, Onix, and CatWorld, specializing in prefabricated wall panel layouts and architectural modeling.
She has experience in both mechanical and electrical drafting, including retrofit projects and fiber optic infrastructure planning.
So thank you so much for joining us today, Genevieve, and I’ll go ahead and turn it over to you.
Okay, thank you so much.
I’m super excited today to do this presentation.
If some of you have attended my last webinar, which was the What’s New, I gave a short tour of our modular module, but it was mainly focused on light gauge steel.
And now I have the honor of presenting to you a nice, beautiful, realistic model in wood.
So it’s my pleasure to be showing you what we are going to be doing today.
Okay, so I did frame a part of these modules in advance, but I am going to walk you guys through a little bit of how this works and how you can use this to optimize and make your projects a lot more efficient.
So you might notice there’s some stuff missing. That’s okay. I did that on purpose.
If ever, you know, we do any troubleshooting, that’s totally fine as well.
I find it’s really important just to cover the little basics because this beautiful modular module is already part of our latest build.
So you might have tested it out already. You might not, but it’ll give you a nice little tour of our basics.
Okay. First of all, I’m going to go to level two and I’m going to kind of give you a tour of how this works.
Now, first things first, very, very important to know.
I’m going to turn on my walls module right away because I am just going to show you really fast.
Oh, actually, I could just, I don’t know. I’ll just draft a little wall here.
Just to show you the basics, I do have everything pre-set up and having everything set up in advance is very, very important.
And it’s all about process. It’s all about having a nice model where everything connects and everything makes sense. That’s how everything frames at its best.
So I will show you, first thing first, I do have pre-created templates that we’re going to be using for this today.
I have pre-created templates for the walls and for the floors.
So I’ll just start by showing you a quick frame of this little wall here.
I’m showing you my little template map.
So if you’re familiar with this already, it’s going to be very easy to understand.
We’re just kind of leaping off what we already know.
I’m just going to quick create this panel right here.
Because I’d like to show you another nice little feature real fast before I deep dive into our modular.
I’m going to open this with our new properties preview version that has our 3D viewer.
Just to kind of show you that it looks real nice and it’s really nice to see everything in 3D.
So we’re going to have all of our basic settings in this first page view.
And then if I go over here, we see our nice little panel viewer.
This does work more like a drag and drop.
So if ever you want to activate and use any of these features, these options, we just drag them over.
Once we highlight them, we have access to all that same information that we had previous in our old properties, in our old panel properties.
So, for example, I could just switch this up to 12 inches.
And I’m not going to, you know, go too deep on this one.
I mostly want to focus on the modular.
But basically, once I hit OK, this change has been made.
Oh, they disappeared. Weird.
OK. It’s possible that I made it too big.
And I might have hit, I just want to make sure, yeah, 12 feet. That’s not really, I shouldn’t have put 12 feet.
I’m going to keep it simple and put one foot like this. That was my bad.
OK. It should regenerate and it’ll look fine.
So it is very helpful to be able to have everything seen in 3D.
It is a nice little feature here.
We can rotate it. We can move it around and the changes that we do make will be reflected.
OK. I’m going to just hop out of this one for now because we won’t be needing this for today.
So I’ll delete that.
But if you know Strucsoft, then you know that we always start with a nice set of templates before we begin.
Okay. Now to our modular section.
I’m going to just switch over to our modular.
And I’m going to explain some really important basics about this nice little module here.
When we begin, it’s very, very important that before we group everything.
Here I’ll go in 3D. It’ll be easier to see.
Before we group everything, we want to keep everything completely empty, which means when it comes to our Strucsoft, anything that’s joins, templates, everything needs to be removed.
We really don’t want anything before we create this group.
Very, very important because all this information that we’re going to eventually have in these groups, we’re going to be pushing it over to these other modules.
And I did remove one of these modules on purpose.
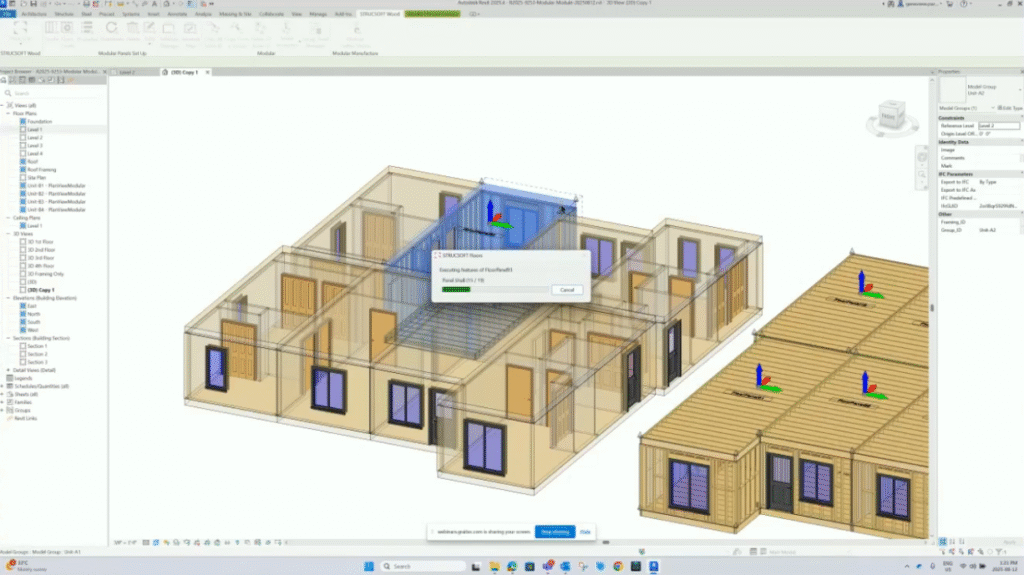
Okay. So even before I added all these joins, I created this group with the floors attached and the walls.
First thing you’re going to want to do with this is you want to copy your groups over before you start adding your joins in the parent groups.
So in this case, I am just going to copy this one over.
And I’m going to use this reference point right here just because I know where it already is.
Oh, it’s not letting me grab it in that direction. I don’t know why I did that, but OK.
Okay. Hold on. I’ll just try and copy that again.
It’s the first time this happens to me like that.
Oh, wait. I know what I’ll do. I’ll just go in a section view. Maybe that’ll help.
Bear with me.
I’m just going to get this. Oh, no. OK. I won’t use a section view.
I’m just going to copy this guy over. It should.
Oh, it looks like it’s wanting to move it and not copy.
OK. Bear with me. Worked in my practice and then for some reason it’s only going on in one direction. Very odd that it’s doing that.
OK. Essentially, though, I’ll just I don’t know why it’s doing that right now.
But you want to create your groups. Keep them completely empty of any join markers and you’re going to want to copy them over in place where you need them to show up in your building.
So these become your child groups and you have your parent groups.
Okay. Once you have these groups created and they are all in place.
So if I look over here, all my child groups were put in place.
They do not have any join markers. They have no additional information. They’re just as is.
And another very important little tip and trick.
In this group, I forgot to add a wall. So that can happen. There’s no worries about that.
If ever this happens, you can simply select your group. You go to edit group. You just click add and you can add that missing wall that you forgot.
And once you do that, you just click finish. This is OK.
And now your wall is added to that. And if it was missing over here, it will be added into your group.
So that information is pushed over to that child group.
Okay. Going back to our empty model group.
Once you want to add your joins, you’re going to just hover over your group. You’re going to hit tab. You’re going to hit your wall just to select it.
Right now, we want to kind of be careful to not jump out of our group.
So we keep hitting tab and then control. And then we select.
We just hit tab, then control. So we start selecting all of the walls in our group.
I’m not going to do all of them, but I will select a couple of them. Control. There.
So I’ll just select these guys for now.
Once you’ve selected just your walls, then at that point, we’re going to go back into our walls module.
And we’re just going to go and apply those join markers.
I already have an auto join rule set up for this project.
And I would definitely say this is the best way to go if this is how you’re going to be doing it.
It’s the fastest method. It’s just going to apply your joins where you need them.
Once your joins are all applied, then at this point, you’re going to be ready to go.
On this side, I already did the work, but I’m going to show you on this side.
We’re going to be doing it. We’re going to be showing you how to do this.
Okay. I’m just going to start here.
We’re going to go back into our modular module.
So we have a lot of really fun new options.
We have our create. We’re going to start by just looking at the create portion of it.
So it’s very, very similar to the create you’re going to find in the walls module or in the floors module.
So once you create, just hit create. It’s going to just take a second for this to open.
At this point, you can select which category.
Now, it is picking up that this group has walls and floors and no ceilings in the roofs.
So I’m not able to select ceilings or roofs.
So I’m going to click walls and floors and hit OK.
At this point, you’re going to recognize your usual walls create panel.
At this point, you can go in to your templates. Same template manager.
All this information is being pulled in.
So definitely, depending on what projects you have and how you’re creating these projects, you can have multiple folders set up in advance.
You could have some that are specifically for module. You could have a lot of different options that are available.
I’m just going to close this for now.
Once you’re in here, oh, I got to go back and select a template.
So if I just highlight the exterior 2 by 6, and I’m going to say set as active and close and then create, I should get another pop-up for floors.
And so we see that it’s going to apply that specific template manually to this group.
I do have a strong preference for the quick create and for the template map, which is what I’m going to show you right after.
So it is taking a minute. And I do believe it’s going through all the walls, but this is the thing.
And this is kind of a catch where I wanted to show you guys is that if you do use the create on the entire module, you’re only selecting one template for the entire series of walls.
So that’s something to be mindful of.
You might want to just tab select one wall at a time and just use the create in that way.
So this definitely won’t be applying the way a template map would.
So it did frame all of my walls. We’re going to just hit OK for now.
And now it is moving on to our floors.
I already have a floor set up for this project, so I’m just going to hit joist floor, frame it now and create.
So this is really doing it the manual way, one by one.
OK, let’s take a look at what this looks like.
I do have horizontal set up. And I’m expecting it’s going to have applied. Yes.
So this is how this is going to work. It is going to apply that one template for all of your walls.
So ideally, you do want to just simply tab select each wall individually.
Now I’m going to undo this because I prefer to use the quick create.
And I do find it a lot faster and more efficient.
So rather than selecting each wall, it does prompt you for your walls first. And then it does prompt you for your floors.
Be very mindful of this part here in the floors. If you’re well versed with floors, you need to make sure you’re deleting the panels and not just the members.
It is going to remove everything at that point.
OK, we’re back to where we were.
Okay, I’m going to go in 3D.
So if you’re well versed with templates and with template maps, this is a really, really nice added feature.
I really, really like this one.
If I go here to template manager, it’ll be it’s basically pulling the template managers from your floors and your walls.
So you’re going to be able to recognize everything that you already created.
And it is going to pull all the same information from your template manager from your floors.
So very, very handy. You don’t have to recreate everything. You’re just pulling that same information.
Once you have all your templates set up, then at that point, you can start creating template maps.
So this template map is designed to pick up everything that you put in it.
So we do have options to put in our walls, our floors, our ceilings, our roofs.
Right now for this project, I only really needed walls and floors.
I already pre-created my template map.
I can scroll down and you can see my entire list.
If you want to create multiple template maps for different modules, you totally can.
It’ll be the same principle as when you’re creating your template maps with your walls.
I think it would probably resemble more the floors module because you do have those different options in the floors module.
But essentially, you’re just going to be creating a new one and you can have multiple maps for a project.
We’ll just call this one test.
Once we highlight our new map, very, very important, we’re going to need to select which ones that we want to add.
For this project, I do need walls and floors.
Definitely click on these before you start adding them because at this point, it is going to ask you which one that you’re going to be adding.
I’ll start with these two.
So you see, it’s just going to start by adding one.
At that point, you’re going to know your way around this.
You simply select which wall you need and which template that you want to associate it with.
Now, in this case, I only really set up one floor.
So very, very important.
Once you want to keep adding these templates for your walls, once I hit here, I’m only going to be clicking on the walls.
And then at that point, we can keep adding walls and start setting up our template map.
For now, I am.
Yeah, so if they have the same criteria, it is not. They’re only going to save the first one.
Very, very important.
So these two, they’re just defaults.
So if I do this, it kind of just jumps out of it. It’ll remove the duplicate.
So if we go back to the one that I created, it’s essentially the same one that I created for the walls.
So you’re going to see a lot of the same stuff for Pete.
Once this is ready to go and ready to use, all you have to do is select it, keep it highlighted.
It’s going to work the same way it does for the other modules.
And at this point, you can start using your Quick Create.
Now I’ll just do one to start. We’ll look at how this frames.
It does make framing a lot easier when you can select an entire module.
Now these modules were repeated on the second floor and the third floor.
So I have like a repeat of these same modules.
Very, very important also how you’re going to name your modules.
You don’t want to get lost in your naming conventions. Try and keep it as simple as possible.
I’m just going to hit regenerate so that my floors reappear, just so that we see that nice framing.
It does give you an idea kind of where to start, you know.
Now, if you already know the software well and you’re just getting into modular, it’s kind of like a step up. It’s kind of definitely a step up.
But if all your basics are covered and you have a nice, you know, a nice model, it goes pretty well. And it goes pretty fast.
So now I have my modular, my other little module.
That’s essentially exactly what I did for all of this side of the building.
Now I’m just going to go back in 2D real fast.
We see that it looks nice.
And we can see that over here, this module is going to be this one.
Okay. We’re going to back up a little bit.
Okay. So as you guys know, if you know the software well, you know that you can go into the properties of this module.
Now it is going to be looking at this panel if I do select that one member.
So you can continue making changes to your panels, whatever these changes may be.
And first, before I go too far and start making too many changes, what I’m going to do, I’m going to show you how we’re going to copy all of this information and send it to our child groups.
Now, there’s a lot of the same similar stuff that you’re going to find in the other modules.
As I mentioned, the properties, regenerating.
In this case, if you hit regenerate, it will regenerate the entire module.
So it will regenerate the floors as well as the walls.
We also have our delete. In this case, it is going to delete everything that is within this group.
We also have an edits drop down.
Edits drop down, since I only have floors and walls in this group, we do have edits that are available for that.
And we already visited these two.
Okay. This is kind of my favorite part because I find this really, really very, very efficient.
We’re going to look at copy all same ID.
Copy all same ID is going to duplicate the framing in identical model groups.
So this being our parent group, we know automatically we’re going to have two child groups over here.
We’re going to just select this parent group. We’re going to select our copy all same ID.
And what do we want to copy over?
Because basically, we’re going to be taking this information and pushing it all over to the child group.
In my case, I do want to copy over the walls and the floors. I’ll just hit OK.
Now, you do have different options.
I know they were possibly covered in the last webinar, but we want to keep it simple.
We’re going to set source panel as parent panel.
So this is going to be set as our parent panel.
And we are just going to simply continue the panel numbering.
Now, we could keep it the same as the original. So you do have both options available.
And you do have the option to lock your panels. We’re going to just keep this one unlocked, though.
So I’m going to hit OK.
And now what it’s going to do, it’s going to push all of the framing configurations over to these child groups.
And this is why it’s important to not copy over any join configuration markers.
Because if we push all that information, it’s going to essentially, it’s going to be like it’s reading multiple, multiple join markers.
And we really only want to push the framing into it.
The same would go for opening markers.
If you’re applying opening markers manually, which means if you’re selecting your openings, like Control-Select, and you’re just applying them manually through the Apply Opening Marker, you’re going to want to keep those empty as well.
You really only want to have your framing and your markers in your parent group.
In my case, my opening markers are part of the structural template, so they are not applied manually.
I found it was easier to just use them that way.
Rather than apply them manually on the group, I found it just easier.
I find it a lot easier to use the maps. It’s so much more efficient.
As long as you know that whatever information you are creating, you’re pushing over here, then you’re good.
And you can see this just, it just framed everything that I needed in those two child groups.
So you can imagine that if you have a large project and you need to start pushing that information over, it sort of read it at the same time, so it automatically framed these two modules at the same time.
And, oh, I’m just going to highlight that and give you a tiny, a little quick spin around.
And just to go back here and show you, earlier when I framed this one and I kind of used the Create and it applied that single template all over, I already had a map set up, so all of my framing is already properly done in this one, and I am using custom joins for this.
So the joins might look a little bit different, they do have overlapped top plates in this case.
And that’s pretty much how that one looks.
Okay, we’re going back in 3D, and right now what we’re going to do, we’re going to kind of do the reverse.
We’re going to copy from a group.
So once I select, oh, that’s my bad.
I’m going to select this group, and I’m going to hit copy from a group.
So our copy from a group, it will copy panel framing from a wall group that has framing to a wall group without framing.
So I want to go steal that framing from that other group.
Okay, I’ll click on that, and it’ll ask me that same prompt.
What do you want to go and copy? I want to copy the walls and the floors.
And right down here it is saying select model group to copy from.
I want to copy it from this one.
I do want to continue my numbering, and my source panel is the parent panel as well.
I’m just going to hit OK.
So rather than click on one and push the information to all the child groups, what we’re doing, we’re kind of doing the reverse, where we’re saying, okay, I want you to take this model group, and I want you to go and steal from the group that I am selecting.
When you are using this feature rather than the first one I showed you, you do have to select one module at a time.
If you select multiple, for example, if I was to select the one on the third floor and the one on the second floor, it would ask me to only select one at a time.
So just be mindful of that. It works a little bit differently.
And there we go.
So I just want to make sure I select the right one, and it should be good.
There we go.
Okay. So now I kind of just did the reverse, where I stole all of that information and brought it over here.
Okay. Now you’re still able to make changes to these panels without a problem.
We’re going to go within this one. I’m going to stick to the end over here. Pardon me.
Okay. So we’re going to go back to just this one wall.
We’re going to make a change to it, and we’re going to go through our properties of the modular module.
So I’ll just hover over this, and I’ll hit tab, because I do want to select this wall.
At this point, I want to go into the properties of the module.
And perhaps I do want to make a couple of changes.
In this case, maybe I want to. I could put the, I’m looking for, okay, this one.
Okay. In this case, I will put them at two feet, and I will just hit close, and I will hit apply.
Now right here, I get a prompt.
You are modifying a panel that is part of a group sharing the same numbering.
Would you like to apply these changes to all instances within the group?
If not, the panel will be assigned a new number label.
Very, very important.
So you have the option to change a group and to have the information pushed to the child group or not.
So very, very important. We’re going to hit yes.
And, okay, it’s automatically going to do it.
There we go.
So you can make, it’s kind of like making a partial change.
When you select multiple panels and you’re making a change within your panel properties, it’s going to resemble that.
Except it’s going to be for the group.
And, of course, a good setup prior to this is always, always important.
I can’t stress that enough.
When it comes to Revit modeling and how you want everything to come out when it frames, it’s very important to model everything the way it’s supposed to be modeled.
Meaning it does have to make sense if you have gaps, spaces between your modules, or if you don’t.
It’s very important to consider how this is going to be framed as a unit.
And in this case, I didn’t really go over the unit names, but I had unit B.
And part of unit B I had the first section, the second, the third, and the fourth.
So I kind of gave them sequential names so that they would be easy to map out and easy to find.
There we go. Should be just about done.
And I’m going to hit OK.
And now it changed that beautiful spacing to 24 inches.
We’re going to go over here and we’re going to see that all of this information was corrected to reflect that panel change.
And it was reflected on both child groups.
And this is exactly what we want.
So you can imagine if you have a really big project and you need to make a change, this can be a very fast method.
So it might look like it takes a bit of time when it’s doing that work behind the scenes.
But if you think about it, you don’t have to go into each panel and start making these changes one by one.
It’s a lot faster and a lot more efficient this way.
OK. When it comes to the delete all same with ID, we’re just going to hover over this.
I find these little descriptions very, very handy.
Deletes framing in identical model groups.
Use this tool by first selecting a group of walls containing panels.
Then select the tool.
This will delete the framing contained within all duplicate wall groups.
So very, very important.
If you’re using the delete here, you are only deleting that model group.
And if you are using your delete all same ID, you are going to be deleting all the other ones that are associated.
So, for example, if I click here and I say OK and I delete all my panels.
It didn’t delete the floor panels, but it did delete all the wall panels.
OK. I’m going to go back.
And right now we have our match properties.
When it comes to match properties, this probably will be the final feature that I will show, only because a lot of these features are sort of a repeat from other modules.
And when it comes to group panel manager and model modular gather sheets, I do think it might deserve its own presentation because there is a nice setup that is put together with this and it would require a lot more time.
But for now, we’re going to just show you this match properties.
So when it comes to matching the properties of a module, this tool will first you do use this tool by first selecting a group of walls containing.
Oh, pardon me. I went a bit too fast there.
Containing panels, then select the tool.
This will match the framing contained within the selected wall group to duplicate all groups that contain framing.
OK. So it kind of works like our properties.
I’m going to just go in here.
Actually, we’re going to go in 2D. It’s going to be a little bit easier.
We’re going to go and use this wall as an example.
So I’m going to hit tab and I’m just going to go into this one wall panel and we’re going to go into our properties and make a change.
Now we don’t want to push this information over to the other groups.
What we’re going to do here, we’re going to make a small change.
How about we add, oh no, we have joins here.
I might not want to start adding extra studs at the end, but perhaps we could add extra studs.
We will do a repeat modify and we’ll just select one of our S verticals.
Now we’ll select S4 and we will make a slight change.
Perhaps we want to turn this into a 2×4.
I’m just going to hit add and I’m going to hit close.
I want to keep this simple and I’m going to hit apply.
Now in this case, I’m not going to hit yes. I’m going to hit no.
I only want to make this change to this group.
So the information doesn’t automatically go to the child groups.
Now I’m going to just hit OK.
So I did switch up this one, remember? Oh, I’m in the wrong group. That is totally my bad.
I was supposed to do this in the parent group.
Well, well, that happens.
OK, we’ll do this again real fast.
You get pretty fast at it when you get the hang of it.
OK, I’m just going to go back into my properties and make it that quick change again.
Miscellaneous. We’re going to go into our extra studs, repeat modify.
There, I’ll pick S5 this time. We’re going to go all the way up.
We have a lot of families in this project.
And remember, the families that we’re using and the properties, the property tags that are attached to it are what is reflected, depending on what parameter that you’re using in your scheduling is what is going to show up.
So I’m going to hit add just because I wanted to switch this member.
I’m going to hit apply and then I’m going to hit no.
And then I’ll be able to hit OK.
This is pretty handy when you have big projects that are dealing with modules.
OK, we’re going to go inspect over here.
And that is exactly what we want.
We did not want to transfer that information because it might happen that you just need to make a change here, transfer the information over or not.
It gives you a lot of flexibility and versatility.
So we’re going to go back to our match properties.
In our match properties, we have match properties on all identical groups or match properties from group.
So in this case, we’re going to just pick this one.
In this instance, we have use this tool by first selecting the model groups, then select the tool, select the existing model group.
The tool will match the framing contained within the selected wall group to duplicate wall groups that contain framing.
OK, I hope I didn’t do the opposite here.
Here we go.
We’re going to match that properties.
Click select. Select.
We’re going to bring it over to this one.
OK. We just want to grab what we changed in the walls.
I’m going to hit OK.
And I’m going to bring it here.
I am going to continue my numbering and hit OK.
I’m almost second guessing the order that I chose.
So it should match up our properties.
This is what we want to do. It’s thinking. It’s doing the work.
So you don’t have to.
We still do the work, but we do it more in the I’d say it’s more of root work, if you will.
When it comes to setting up all of our templates, you know, all of our template maps, all of our join markers, all of our opening markers.
Those are all root information that we need.
Ah, I see.
So now I see what I did.
I did do the reverse and that’s OK because it’s important to know that there are other ways of using that tool.
So what this did is even if I made a change here, it matched the group here.
So it kind of did the reverse of what I was aiming for, but that’s OK.
I think we still get the gist of that one.
So essentially, I probably would have wanted to keep it the way I did it the first time, but it still works very, very nicely.
So if ever you need to make edits to these groups, there’s many different possibilities and ways of making these edits.
So all of our framing looks nice and I’m seeing that we’re kind of getting low on time here.
So I might just leave the last portion for any questions that you guys might have, but this does cover the essentials of our beautiful modular module.
I kind of get mixed up in that one.
And that’s that’s kind of me.
They’re very similar words, but I really love this this new module.
Very, very handy, very practical, very efficient.
And I value efficiency and quality above all.
So if there’s any questions, I might hand this over.
I can see there might be some questions.
OK, and we’ll take a look at our chat.
I hope everything looks nice.
Ah, yes.
OK. So I am going to take a quick glance at these questions at the end.
Ah, there you are. Clemens. Clemens. That sounds French.
Yeah, it’s French.
No, we don’t have any questions.
If you guys have a question, you can drop it in the chat right now.
I’m going to, we’re going to leave you like maybe a few seconds to write it, if you have it.
But thank you so much, Genevieve, for this really interesting session.
Thank you guys so much for attending.
I really appreciate it.
I appreciate showing it because I really, I really enjoy.
I enjoy modeling and I enjoy seeing how everything unfolds.
Yeah.
I don’t think we have any questions.
So we are going to wrap up this webinar.
So thank you all for joining us today.
We really appreciate you spending your time with us.
And we hope it was meaningful and impactful for you and for your business.
We look forward to see you on a future.
Oh, we have a question.
So you mentioned that opening markers can’t be transferred.
Does this include Zeus in bearing either settings?
Yes.
So when we, when we’re looking at a light gauge steel, yes, there are those bearing settings.
It does work a little bit different in wood.
This is the only reason why I couldn’t show you that portion today.
Because we have different markers that are set up for wood.
And if you’re very well, we’re well versed with, when it comes to the, I just open up here.
If I open up our list, you’re going to see, it’s going to look a little bit different.
And we don’t have the same, the same bearing markers.
So where you can use the, the built up sections in the bearing portion and kind of use that within your opening markers.
We don’t have that option in wood at this time.
But yes, in light gauge steel, if you’re already using those, if you’re already using those markers within that list, it will be the same thing.
So they will be, they will be used.
Okay. Perfect. Thank you.
Yeah. Okay.
Another one was more referring to the bearing settings in MWF props.
Bearing settings in MW, oh, oh, in the properties.
Oh, it should.
If it’s in the properties, in the panels properties, you should be able to use that same information.
Because essentially we’re just going and we’re referencing the panels property.
For example, if I just go here real fast, I’ll just select a member and I’ll go right in.
So if you have that option in your properties, in your panel properties, then you will have that option that you’ll be able to use same way you would.
It’s just going to be referencing it and bringing it into that modular module.
So you should, without a problem, be able to use that.
I just don’t think we have these bearing.
We don’t have the same bearing settings in the panels properties for wood as we do in light gauge steel.
Okay. Perfect.
I hope it answers your question, Kylian.
If, okay, but gotcha.
Okay. Perfect.
I think we have no more questions.
So I think we can wrap up this webinar.
So, as I said, Genevieve, thank you so much for these very interesting sessions.
We look forward to see everyone on a future webinar and I wish you a good day.
Yes.
Thank you very much and have a great day.
Bye.
Some of our international clients that use our software


