How to Create Rulesets and Templates with Strucsoft for Revit
Date
Duration
Speaker

Aparna Bhatia
Technical Solution Specialist
Watch the recording
What’s the webinar about?
Discover how to build efficient, scalable Revit templates that streamline your Strucsoft (formerly MWF) framing workflows.
This webinar explores best practices for preparing Revit projects for MWF, standardizing wall types and framing sizes, and creating reusable templates that support steel framing production. You’ll also learn how to optimize opening framing using custom markers and automated rule sets, helping teams reduce manual work and ensure consistent, accurate output across projects.
Ideal for BIM teams, detailers, and anyone looking to improve efficiency in Strucsoft for Revit
What you’ll learn
- How to structure Revit projects for consistent, repeatable framing workflows
- Best practices for preparing and standardizing wall types, framing sizes, and template components.
- How to create and customize Strucsoft templates and markers to support project accuracy and efficiency.
- How to automate opening framing using rule sets to reduce manual work and improve production consistency.
Read the full video transcript
(MWF has been rebranded to Strucsoft)
Hi everyone. My name is Aparna Bhatia, as Rishabh mentioned. Today, we’re going to show you how to do a few things. We’re going to learn how to start a Revit project that you can use as a base to create your future MWF projects or to frame your future MWF projects. We are also going to learn to import sizes and types that are needed for your templates. We’re going to learn to create a custom template with those sizes that we imported, and then I’m also going to go through how to create custom markers and apply those markers manually to your openings — as well as automating them by creating rule sets.
Creating templates and markers already automates your process, but applying those markers can sometimes be manual. I’m going to show you how to automate that by creating rule sets.
Let’s get this party started. Here you’ll notice I have nothing open. I wanted to start from scratch, as I would for an implementation project. The first thing to consider is: are you working with wood or steel? For today’s webinar, we’re going to work with steel.
Every single time, I go to File → New → New Project. Even though I’m creating a new project, I also have the option to create a project template. Since I’m working on templates, let’s go ahead and create a project template.
If you’re working with steel, I recommend starting from the Autodesk Revit Commercial Template. If you’re using wood, I recommend starting with the Residential Template. The reason is simple: the wall thickness presets differ. A wood wall with a 2×4 stud has a 3.5″ structural thickness, whereas steel studs are typically in neat nominal thicknesses like 4″. These templates already have several correctly configured walls.
Inside the Commercial Template, under Families → Walls → Basic Walls, you can preview the included wall types. My favorite wall to use — if you’ve ever watched my other webinars — is Exterior Brick on Metal Stud. The reason I use that wall is because you can clearly see the exterior and interior sides. When setting up templates and rule sets, it’s important that the exterior side is visually distinct so you know the panel orientation when setting up shop drawings.
When I draw out a wall, I always set my plan view to Fine and my scale to 3/8”, because I use that view as my base when creating view templates for shop drawings. Later on, when I set up documentation views, I adjust the scale before saving the template.
This wall is very basic — one structural layer, a substrate layer, and a finish layer. This makes it excellent for testing sheathing templates like OSB, ZIP, or plywood, as well as gypsum board templates. The materials are clearly defined, and it’s easy to tell exterior from interior, which helps when setting up sheathing.
I review the Families section so I know what’s in my project. If you’re only doing interior work and don’t need masonry walls, feel free to delete them. But I like keeping generic walls (like Generic 6″, 4″, or 12″) for foundations or furring.
Remember: this is a template intended to accommodate many future projects. Don’t remove things just because your immediate project doesn’t need them.
Next, we need to ensure we have the sizes and types we want for templates: garage doors, door sizes, window sizes, wall types with specific structural thicknesses and sheathing configurations. Gather everything in one project file so you don’t have to re-insert or re-test them later.
When working with custom families, always test them in the template first, frame them with MWF, and ensure everything behaves correctly. We’ve all been on deadlines where we end up “faking it,” but with MWF, accuracy matters — especially for stud sizes and Bill of Materials.
I make my view Shaded with Transparent Walls so MWF members are visible. I then draw a few walls that I know I’ll need for testing.
To load families like doors and windows, go to Insert → Load Autodesk Family. If you don’t need a full frame, the simplest option is Window – Square Opening, which gives you a clean rough opening.
I load standard sizes (e.g., 36×60, 48×36, 24×60). Then I also load garage doors, passage doors, etc. Once Revit items are loaded, it’s time to load MWF Families.
Go to Load Family → C:\ProgramData\StrucSoft (now Graitec) → MWF → Imperial → ProMetal or ProWood. Choose your manufacturer (Howick, FRAMECAD) or use the standard BIMS families like bimsf_ssmas (C-stud) and bimsf_ssmat (track).
Load the stud and track sizes you need: 162, 250, 362, 600, 800, etc. Your template should evolve as your company evolves — add or remove sizes as needed.
Once everything is loaded, we begin creating Custom Templates. I start with the Light Gauge Default for a 6″ wall, duplicate it, and customize vertical studs, top/bottom tracks, cripples, offsets, horizontal members, etc. Then I save it in a folder like 00_MWF_Webinar with a name such as:
600S200-43 @ 16” O.C.
Then I generate the panel and check it in 3D. I often apply a project material scheme using colors like cyan for 33 mil thickness to visually verify stud gauges.
Next, I place windows and doors in the wall, including a garage door, adjust wall height, and regenerate the panel to test how everything frames. By default, MWF auto-frames openings — but we can override that using Markers.
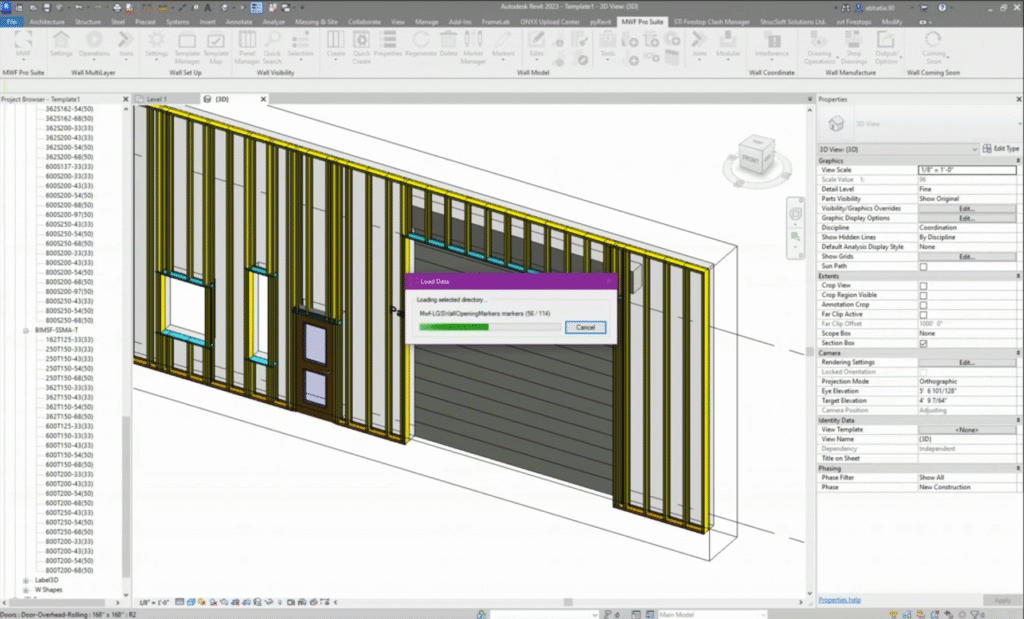
To create markers, go to MWF → Marker Manager → Load Data. Then create a Multiple Built-Up Member Marker for things like box headers for garage doors. Always duplicate defaults — never modify them directly.
You can define header sizes, cripples, kings, jacks, jams, add clips, define rough opening usage vs. actual dimensions, tolerances, and more.
Create markers for:
Box header (custom)
Default non-bearing opening
Ignore openings between studs
Test each marker by manually applying it to an opening and regenerating the panel.
Once markers are working manually, it’s time to create Rule Sets.
Go to Project → Wall Opening Mapping, duplicate the default, and start adding rules. Order matters: specific rules first, general rules last.
Example:
If Door Type = Rolling Overhead, apply Box Header Marker
If Opening Width = 0–2 ft, apply Ignore Between Studs
If Opening Width = 2’1″–6′, apply Default Non-Bearing Marker
Apply the rule set in Panel Properties → Opening Framing → Use Opening Mapping Rule Set.
Regenerate and test — confirming garage doors frame with box headers, small openings are ignored, and normal windows/doors frame with the default marker.
Finally, duplicate the wall again, regenerate, and verify everything is saved to the template. I do this for every wall type during implementations.
That’s it for today’s webinar. If you have any questions, feel free to ask. Thank you, and I’ll see you next time. Bye.
Some of our international clients that use our software


