From Revit to Your CNC Machinery with Strucsoft Framing Software
Date
Duration
Speaker

Marilyn Harrigan
Consulting Services Manager
Watch the recording
What’s the webinar about?
Discover how to streamline your design-to-fabrication workflow with Strucsoft and Onyx. In this practical webinar you will learn how the best practices for setting up your Revit model, Strucsoft’s automated panel creation process, cloud-based project management, and CNC configuration. Ideal for teams looking to accelerate the design, coordination engineering and manufacturing of off-site, modular or prefab structures in wood or light gauge steel.
What you’ll learn
Read the full video transcript
Hello, everyone, and welcome to today’s webinar: From Revit to your CNC machinery with Strucsoft and Onyx. My name is Marilyn Harrigan, and I’m a Consulting Service Manager at Strucsoft, part of Graitec Group. Let’s dive in.
Here is what we’re going to be covering in today’s session. We will start with a brief overview of the workflow from Revit to Strucsoft and Onyx, followed by a technical demonstration of the software.
In this webinar, we will cover best practices to follow when setting up your Revit model with Strucsoft. Next, we’ll jump over to Onyx, a cloud-based web application where we’ll be spending most of our time today. We’ll find out how to properly set up machine settings and other options. Once your framing is imported, we’ll cover how to make edits to members—handy for last-minute changes—creating work orders, generating CNC outputs, and reports.
Before we jump ahead, feel free to check our full event calendar and register for an upcoming event by visiting the link in the slide. If you’re new to Strucsoft or Onyx, I highly recommend watching our recent client story with Blueprint Robotics to find out how off-site manufacturing can greatly benefit from using our plugin.
You are always welcome to get a free trial by visiting our website and filling out a simple form, or you can contact us directly at [email protected].
The workflow
Revit → Strucsoft → Onyx
Starting with a Revit project means no data is lost in file transfer. The structural model links files to keep tabs on changes and coordinate construction in the model fabrication model. The fabrication model contains all feature-critical and manufacturing processes for shop documentation, creating custom shop drawings with full dimensions, bill of materials, and cut lists for manufacturing. Strucsoft creates detailed parametric framing in seconds. Easy-to-use templates encourage coordination across the team, reduce estimated cost errors on site, and transfer easily to the shop floor. You can create detailed manufacturing documentation, manage and create CNC code to power and organize factory outputs, and keep tabs on project health and factory output from the cloud.
Onyx handles bundling, stacking, and organizing panels into bundles or stacks for transportation. It allows you to manage, define, and create work orders, make panel edits (including last-minute changes using our CNC editor), and generate barcodes/QR codes for tracking.
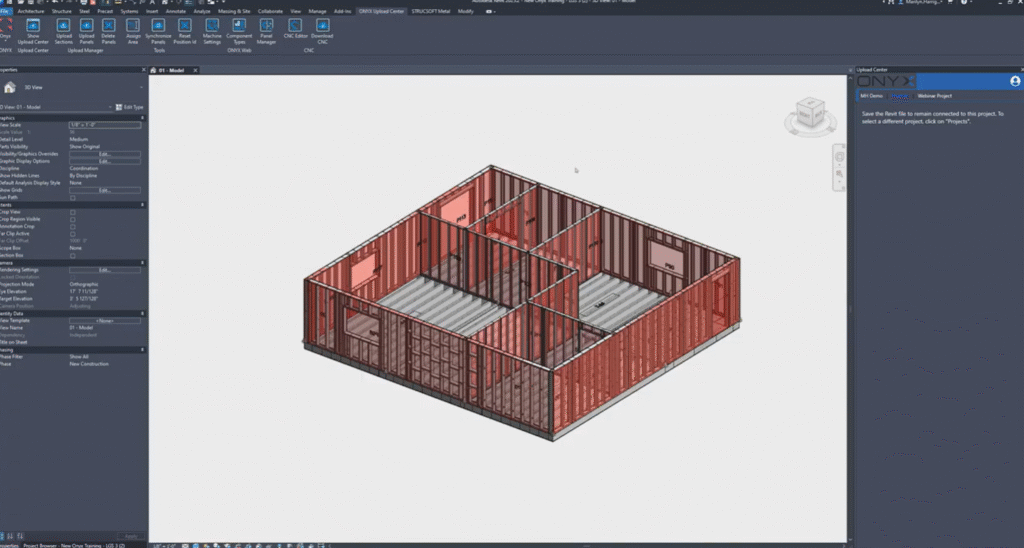
Now we’re going to go into the technical demonstration. You can see we are in Revit, and our plugins are already installed: Strucsoft Metal and the Onyx Upload Center. In this portion, we’re focusing on the Strucsoft portion first, then moving into Onyx.
Here I have a model created in Revit using Revit elements. I’ve already modeled four panels for this example. I’m going to show you how to set up the walls to upload them to our Onyx web application so we can output and make modifications.
First things first, I already have my template map set up. The software is template-driven. In these templates, you save information such as stud types, spacing, and very important cutbacks for manufacturing. Here I have templates for 6-inch and 3.5-inch (350) studs, so my template map is ready to use our Quick Create command.
To run the Quick Create command, select your walls—here I have about 11 walls—and hit the tool. The software looks at the wall type, matches it to the template map, and frames based on the corresponding Strucsoft template. You can always go in afterward and make changes if a wall needs a different template or additional modifications.
You can see it processes the panels quickly—in this case, 11 walls were framed in about a minute. The software automatically detects openings and frames around them based on the template, such as using flat headers, jacks, kings, or box headers in different locations. These details are set up in the templates.
You can select a panel and go into its properties to make modifications. For example, adjust cutbacks so headers go to the outer king. This ensures correct operations when brought into Onyx and associated with machinery settings. Cutbacks are very important to get right.
If you need to add horizontals (blocking), go into properties → Miscellaneous → Horizontal tool, add members, set references (e.g., from center), member types, splitting, punches, and other operations. Once set, the blocking appears as configured.
Holes are critical for CNC. In properties → Miscellaneous → Holes series, add holes with specific types and assign CNC operation codes matching your machine (e.g., round hole, slot hole, service hole). Set vertical spacing, justification (bottom/top), offsets, and spacing. This places holes consistently across studs or panels.
Once the model is set up as desired, upload it to Onyx to configure CNC settings, make additional operations or changes, and create CNC output files.
In Revit, use the Onyx Upload Center ribbon (or show it if hidden). Log in with your Onyx account credentials—if you don’t have one, sign up via the link. Select or create a project, then upload sections first (shapes/types used in the model). Upload any lumber, sheeting, or hardware components as needed.
Then select panels (individually or full project) and upload them to Onyx. Panels appear in the list; a green check means the component is already in the cloud. If something is missing, use the shortcut to the Component Upload Manager to add it.
After upload, panels in Revit become locked (red box around them) to prevent modifications. Only shop drawings can be generated while locked—any property change triggers a warning that the panel must be unlocked first.
Now switch to the Onyx web application (log in if needed). You’ll see your project with the uploaded panels (e.g., 34 panels here).
Go to Settings → CNC Machine to set up or select your machine (e.g., Howick in this example). Create new settings or duplicate existing ones. Configure machine options, web width, punch/lip cut/notch/swage details, display units, tolerances, and other specifics to match your machinery.
Associate CNC settings to component types so panels using those members apply the correct machine configuration.
In the project, create work orders (name them, set deadlines), then assign panels (e.g., one for 600-series walls, another for 350-series or floors) by selecting and adding them.
In Panel Manager, view all uploaded panels with details like name, length, height, weight, profile, status, and more. Customize visible columns and save views.
In the CNC Editor, load panels (filter by work order, level, etc.), view operations, and make last-minute edits—add holes, web punches, invert operations, change orientations, etc. Use the Code Viewer to preview temporary operations. Save as draft or Publish for final changes.
Once edits are complete, go to Panel Manager, select panels (or all), and download CNC output—it generates a zip file (often including Excel with member details and operations like lip cuts, dimples, etc.). You can also download per panel directly from the CNC Editor.
In today’s webinar, I covered settings for wall panels in Revit, uploading sections and panels, configuring CNC settings in Onyx, creating and associating work orders, making changes in the CNC Editor, applying those changes, and downloading outputs from Panel Manager or per panel.
I hope you have a nice day, and please let us know if you have any questions!
Some of our international clients that use our software


