Efficient Steel Framing Design and Fabrication with Strucsoft and Scottsdale
Date
Duration
Speaker

Hana Elayan
Solutions Architect
Watch the recording
What’s the webinar about?
Explore how to streamline the design and production of light steel framing with Strucsoft and Scottsdale CNC machinery. Find out how you to place Scottsdale Revit and Strucsoft families in your walls, floors, roofs and trusses. Discover features that will enable you to prepare your models for precise fabrication, and finally, generate manufacture-ready CNC output from your Revit models. A must watch webinar for manufacturers and offsite builders.
What you’ll learn
- Frame walls, floors, and roofs in Revit with Strucsoft
- Save and reuse custom templates for consistency
- Seamlessly transition to production with ONYX
- Generate CNC output for Scottsdale equipment
Read the full video transcript
Hi, everyone. This is Hana, and thank you for joining us for this week’s webinar. We’re thrilled to showcase the Strucsoft to Scottsdale workflow. A special thanks goes out to Oliver Roth and the Scottsdale team for partnering with us today. We’re excited to show you the powerful capabilities of our newly rebranded Strucsoft software, formerly known as MWF, and to showcase ONYX, our seamless production integration tool. Oliver will also walk you through the Scottsdale output and frame production software for Scottsdale. I’ll be demonstrating how to generate CNC outputs in ONYX, specifically for the KFD Framemaker machine. Oliver will walk you through a different workflow using Scotpanel and Scot Truss. We also encourage you to explore the full range of machine applications on the Scottsdale website. And just a heads up, what we’re showing today will even be more streamlined. Both Scotpanel and Scot Truss will be integrated into the ONYX workflow.
Framing in Revit with Strucsoft. I’m already in Revit 2025—keep in mind you’ll want your model ready in Revit before you start framing. For this demo, I’m using Strucsoft 9253, ONYX 2025 0321.4, fully compatible with my Revit setup. Let’s dive in. First, I’ll set a bit of transparency on my walls, floors, ceilings, and roofs. That helps us clearly see the framing components we’ll be applying. Remember, your Revit model needs to be properly built with the openings, and everything has to be modeled before you start framing.
Creating your first wall panel. To create a panel, select the wall you want to frame. In the wall module, click create. Pick an out-of-the-box template, light gauge, and set it as active, and click create again. And just like that, you’ve created your first panel. From there, you can start customizing your own template by creating a panel member and heading to the new properties panel, the beta. Here, you’ll assign your horizontal, vertical, bottom, and top tracks using families you’ve already loaded. If you haven’t loaded your families yet, you’ll find them under Strucsoft menu, home directory, imperial or metric, manufacturers. For today’s session, we’re mixing in Clark Dietrich and Scottsdale families. Load them via Revit, insert, load family, pick your sizes, and you’re ready to assign them in your panel. You can manage stud spacing, horizontals, and customize exactly how your panel should look. If you ever move a window or opening in your Revit model, simply regenerate the panel to update your framing. Use the marker manager to define how your openings are framed, whether it’s multi-systems or specific truss headers, assign markers, regenerate, and you’re done.
Framing floors and roofs. Switching to floor framing is just as intuitive. Select your floor, switch to the floor module, pick your truss template, and hit create. In properties, you’ll define joists and sidetracks. Today, we’re using Scottsdale hat truss families. Roof trusses follow the same process. In the truss module, pick your truss members. Again, we’re using Scottsdale hat trusses here.
Saving templates for consistency. Once your panels are set, save your templates. This way, you can reuse them all across your projects, keeping standards consistent and dramatically speeding up your workflow.
Uploading to ONYX for CNC production. Now that your model is framed, let’s move to production. We’ll upload to ONYX, our online platform for managing CNC outputs. I’ve already created two projects here, Scottsdale AMS and Scottsdale Beck. You can mass-select all panels or selectively upload certain ones. You can filter by walls, trusses, levels, or areas. Before uploading, use the component upload manager to ensure all families are recognized and correctly defined. Once they’re all shown in green, you’re ready to upload. When uploaded, panels show highlighted in red in Revit, confirming they’re locked and synced with ONYX.
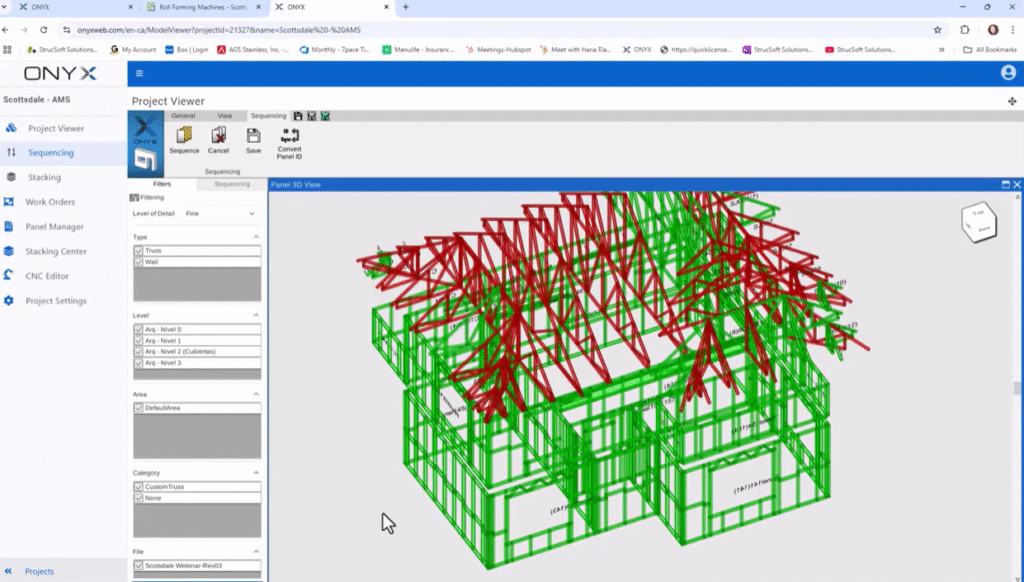
Navigating ONYX for sequencing and stacking. In ONYX, you’ll see your project populated with all the panels. From here, you can view your model in the project viewer. Create sequencing to control fabrication order. Set up stacking and bundling for optimized shipping. We’ve got dedicated webinars on advanced sequencing and stacking. Be sure to check those out for deeper dives.
Configuring CNC machines: AMS and Beck. Beck vs. AMS specifics. Beck and AMS are both machine controllers that are meant to be used with roll-forming machines. Both use similar approaches for machine options, print, and hold settings. AMS settings include explicit fields for hole diameters, print clearances, especially near dimples, and label formatting. Advanced positioning is present in both Beck and AMS. For AMS, we’ve pre-configured machine dimensions, tolerances, notch widths, and print options to ensure traceability and precision. ONYX generates advanced positions, advanced position IDs, for example, 003 during CNC export. These IDs are synchronized back to Revit via Strucsoft and ONYX. Similarly, for Beck, we’ve defined build areas and specific punching, cutting, and shear settings—your outputs are tagged for accurate downstream fabrication.
Build area and CNC integration. The build area parameter, when entered, is passed to the CNC output. It helps tag panels by levels or zones, for example, level 1, block B, to ensure the CNC knows the panel placement context. These settings are crucial. They align your digital model with the physical machine, ensuring every cut, punch, is exactly where it should be. If you need help setting these up, reach out. Our team, or your machine supplier, Scottsdale, can assist.
Rolling out CNC outputs. Back in ONYX, we assign which panel gets produced by which machine. For today, Clark-Dietrich panels go to AMS and Beck machines. Others are queued for Scottsdale machines that Oliver will showcase. We filter, select the panels, and download CNC files. Each download packages the precise manufacturing instructions your machines need. Beck and AMS TXT files include sections, materials, and CNC settings. We can even inspect each member in the ONYX CNC editor, see operation codes, and verify machine settings before rolling. And now, I’ll hand it over to Oliver Roth, who will walk you through another workflow. Also moving from Strucsoft to Scottsdale, but this time focused on the Scotpanel and the Scot Truss machines.
Thank you, Hana. Thank you, great tech, for the chance to join the webinar. Within Scottsdale, we have different types of roll-former machines. This is our website where you can have a look at all our product. The KFD and the KFS has been already covered by Hana through ONYX. I’m going to go through the Scotpanel and Scot Truss to work with the Scottsdale family profiles. This means that I need to go into Revit, I need to select one of those families, that’s the Scottsdale C section. I’m going to select all the similar within the view to ignore any other type of panels. And then we’ll go into Strucsoft solution, ltd, on the CNC, and create the SCS files. The SCS file is the type of file that then we’re going to be importing into Scottsdale. Then we’re going to look for a folder where to save this. I’ve got a folder here at the desktop, select. The Strucsoft solution, ltd, is another plugin supplied by Graitec. I’m going to hit then I’m going to go and open Scottsdale, which is the design software for Scottsdale.
Within it, on the project view, we can go to file, import SCS data from Strucsoft. I’m going to choose the folder, and I’m going to navigate all the way down to that world folder that has the SCS file. You can notice that it might be, it is empty, it is not empty. This is how it looks because we are aiming a folder and not a file. I’m going to hit and we can see all the panels from the Scottsdale family already in here. The first thing you want to do is to check the collision test to make sure that all the items are adequate to be sent into production. If you find issues collisions in frame, you can then go back into the Revit, great tech Strucsoft, and do the changes. Or you can do those to adapt those changes in here. Let’s say I unblock this and delete that member, and we’re good to go.
Once you’ve gone through all of the collisions, we need to make sure that all the panels have the correct gauge. There’s a tool here which will show us, with a color, the gauge that we’re choosing. Each gauge within Scottsdale can be assigned a different color, in this case I’ve assigned all of them to the same gauge. We’re going to bring the trusses now, I’m going to go back into Revit, and for the trusses I’m going to select the whole thing, because I know all the trusses have been designed with the Scottsdale family. Again, going to Strucsoft solution, into the truss CNC. We’re going to choose a folder, let’s go to the truss, select, and back to Scottsdale.
In here, again, we’re going to go into the import SCS data from Strucsoft, and we’re going to choose a folder. Let’s go back to the webinar, into the truss folder, and select folder. And you can see that we have in here all the trusses that were designed within Revit. Once we make sure that the connections of the notes are correct, it’s a good idea also to go through Scotsim, to have a look at the trusses and see if the connections are correct. If you find any issues within the connection of the trusses, you can then, let’s do, we have a tool that’s called check for connections. Sorry, the trusses are locked, we need to unlock them first. Select, we’re going to select the padlock, and then we’re going to do the optimize web joints. That will fix the web and the notes, in order to have the truss properly produced.
Once we’ve done that with all the trusses, we can do all of the trusses at the same time. We are going to go into file, and export to RF. The export to RF window will allow us to choose what type of panels we want to send into production. At the moment, I just want to send the whole thing, I’m going to choose a folder. In the desktop, I’ve got my webinar, a ref. We could eventually separate the walls from the roof, but we’re going to just create everything all together. It’s a good idea to have a single file for each gauge selected. That means that if you have different types of gauges within the project, it’s going to create one for each of them. That way, you can stop the production, change the coil, and load the whole new file into production, and avoid errors.
I’m going to hit export, and that will give me a chance to open. It’s taking me to the folder that has the EP2 file that we’re going to load into ScotRF panels, and then it has a TXX file that is the files for the trusses that we’re going to load into the ScotRF trusses. The PDF is just a file that will show you what do you have within that file, what panels do you have, and what sizes they are. And we’re going to now go into ScotRF. ScotRF also comes with the Scottsdale software package within it, and this is the software that is connected to the machine. This is the controller of the machine, in here, we’re going to go to select frame and load the project.
Let’s grab the waltzops folder. Let’s go to RF and select the folder, and we can see that the file has been uploaded here. It’s the EP2 file. We’re going to do double-click to that file, and we can see the list of panels within that file. We can then send all of those panels, all of those frames to production, and hit. Once we’ve done that, it’s just a matter of fact to click on run, and the role formula will start producing each of these members. Once it’s finished, it will go to the next panel, and until you finish the whole production. This is a simulation, it’s normally not that fast, but it’s really, really fast. I’m going to close, and the last one, which I’m not going to go too much into it, is the Scott Truss, and the functionality is the same. You go to select frame, you load the panel, and then you hit run. The only difference between these two is that the Scott Panel will work with all the C section profile, and the Scott Truss will work with all the top hat section. And that’s it for me. Thanks, Hana. Back to you.
And that’s it. From building your model in Revit, framing with Strucsoft, managing production in ONYX, to generating machine-ready outputs, your workflow is streamlined end-to-end. Thank you all for joining us. We hope this session helps you take your framing and production process to the next level. Be sure to watch our other webinars for advanced topics: sequencing, stacking, and multi-machine coordination. Thank you all for joining us. Thank you.
Some of our international clients that use our software


