Automate Sheathing Design with Strucsoft for Revit
Date
Duration
Speaker

Hana Elayan
Solutions Architect
Watch the recording
What’s the webinar about?
Say goodbye to spending tedious hours modeling sheathing in Revit. Find out how your team can automate this process by using Strucsoft’s poweful tools in this insightful webinar. Whether you’re working with single-layer or detailed multilayer panels in Revit, you’ll learn how to efficiently apply sheathing with bonus pointers on creating precise shop drawings. Whether it’s design, coordination or fabrication – with Strucsoft, efficiency is at your fingertips.
What you’ll learn
- Add sheathing to existing framed panels
- Automate sheathing across entire projects
- Edit and customize sheathing efficiently
- Generate dedicated sheathing shop drawings
Read the full video transcript
Hi everyone, this is Hannah and I will be your host for this week’s webinar
from Strusoft Solutions Graitec Group. Our topic today is how to automate sheathing in Revit.
We will be featuring our BIM framing solution MWF which is currently being rebranded as Strucsoft.
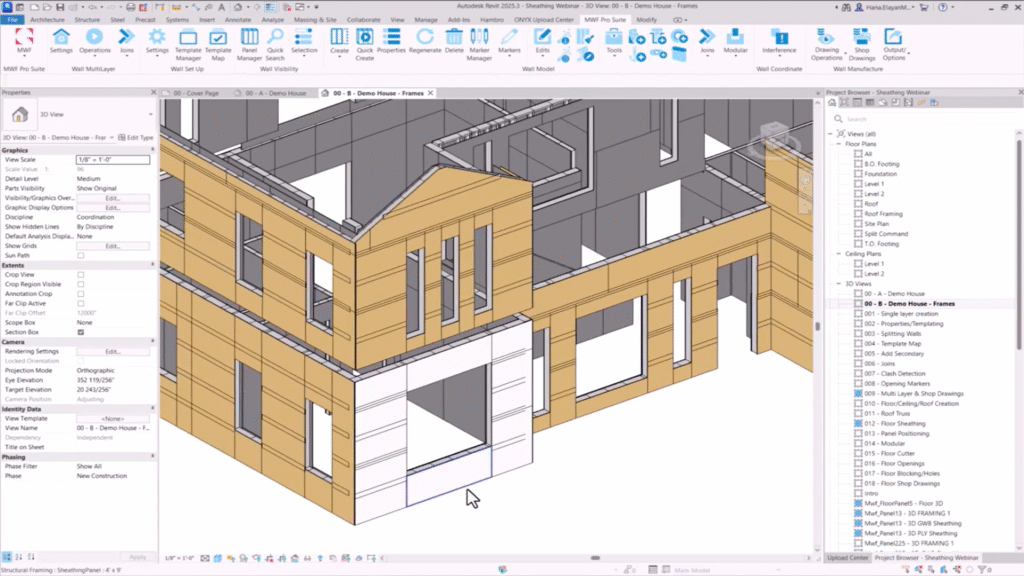
So what do we mean by sheathing? Here we have a wall panel. It has been framed using our software.
As you can see we have an interior layer of framing and we have a sheathing layer on the side.
This layer right here represents a layer of gypsum wallboard. Right here there’s another sheet
and another sheet right next to it. If I turn this panel around you can see that on the other side
we have another layer of sheathing. This layer is plywood and it’s oriented in a different way.
As for our floor panel right here, you can also see that we have a floor panel that has been framed
with some framing elements over here and if I hover over this and hit tab you can see that we have
another sheathing component over here for our floor sample. So elements that I just mentioned
are all considered sheathing elements that can be automatically modeled using our software. You
wouldn’t have to actually manually place them one by one. I’m going to show you today that you can
model sheathing along with your framing with the press of a button. This is the topic of our webinar
for today. Let’s go over the bullet points. First we’re going to talk about how to add sheathing to an
existing panel. Then we’re going to talk about how we can apply the sheathing to multi-layer panels.
So this is the automated option and then we’re going to talk about how we can edit modify sheathing.
So after you’ve created it, how can we edit it? We’re going to go over sheathing customization tools
under the operation menu and then we’re going to talk about defining sheets for sheathing and shop
drawings for walls. We will go over floor sheathing and we’re going to go over defining sheets for
sheathing and shop drawings for floors as well. Let’s go over here and see our project in the 3D view.
So this is our project. We have a house and you do need your Revit model to be ready
before you start framing or adding sheathing. What the software will do is it will take these hosts
such as walls, ceilings, floors and roofs. If you’re framing roofs, it will use these hosts
to place the framing within the hosting elements. You can see on my end that I’ve already added
some transparency to my elements. This is just a visual setting that we like to do in Revit.
If I hit VV on my keyboard, you can see that I have changed the wall transparency to make it 60%.
For the floors, I haven’t added any transparency yet. We can do that later. And I didn’t add any
transparency for my roofs just for my walls for now. Let’s go ahead and create a panel.
To create a panel, I’m going to select the wall that I want to frame. I’m going to go to the
MWF tool and this is the MWF ribbon. I’m going to switch to the wall module. I’m going to select
create. I’m going to select an out of the box template, light gauge, set as active, close,
and then create. And now I’m just going to hit OK. You can see that I’ve created a framing element in
this wall. If I go to another view where I can only see the framing, this is how our framed wall looks
like right now. If I select this wall and click on edit type. And if I go over here to the structure,
click on edit. You can see that my wall consists of the following layers. There’s one structural
layer between the two core boundaries. The thickness is defined in the Revit element. And this tick right
here is very important. This is how the software recognizes that it has to place the framing in this
layer right here. Any additional layers such as the ones we have over here have to exist above or below
the core boundaries. You can use any one of these layers to add sheathing. We’re going to add a
sheathing layer over here for the wood sheathing plywood. And we’re going to add another sheathing layer
over here for the interior finish gypsum wallboard. The thicknesses have to be defined in Revit and MWF
is going to use this thickness to create the sheathing layer that we’re about to see in a little bit.
I’m going to hit OK. And now the first step we have to do is if we go here to our MWF tools,
we’re going to go over here to the wall multi-layer menu. The first thing we have to do is make this
single layered wall into a multi-layered wall by clicking here on add secondary. This adds a secondary
layer to your wall. And that’s it. Now I can access the wall properties. Right now I’m going to be adding
two layers, sheathing layers to one panel, the panel that I have selected over here.
And as you can see, MWF can recognize the layers within this Revit wall. Whenever I hover over one
of them, you can see here on the side that the layer gets highlighted in blue. This is the one
that already has a structural layer. Let’s go ahead and add a sheathing layer over here. What I will do
is click on where it says none. I’m going to go over to sheathing and I’m going to use one of the
templates that I have already pre-created for this presentation. I’m going to go to
exterior for this one, demo exterior, click on select, and I’m using a specific template.
I will talk to you later about how you can customize your sheathing templates.
And now I’m going to go to the interior, which is the gypsum wallboard layer, click on none,
go to sheathing, and I’m going to use a pre-created template. I will select it.
This will lock these layers to the template. I’ll go over this in a little bit. For now,
I’m just going to untick. This makes them into an instance. And now I’m going to hit OK.
I’ve added a sheathing layer to my panel or two sheathing layers. If I click right here, you can
see that we have a sheathing panel, which is four by 12. And on the other side, if I go to my other view
and I turn this around, you can see that on the side, we have a plywood layer. And on this side,
we have a gypsum wallboard layer. And you can see the dimensions of the families that are being used.
This part over here just indicates that there’s another wall. Because we hit that wall, we can see
that the gypsum wallboard has stopped in that corner. And the same goes for over here as well.
So this is one technique. This is how we can add a sheathing layer to an existing panel. Let’s talk
about the other technique, which is to apply sheathing to multilayer panels, which is the
automated option of creating your sheathing. To create templates for your automated sheathing,
we’re going to go back to this menu right here. Under the wall multilayer menu, the first icon
is the settings menu. When you click here, this takes you to this dialog box where you can set
up your wall type maps. This means that you can create template maps for all your layers in this
dialog box over here. You can access all your Revit walls. You’ll find them all populated over here.
And to make life easier, I’m just going to type in to find the walls that I need for my project.
And you can see, these are the walls that I’m going to be using for my project.
I’ve already pre-created some templates and I’ve attached them to the layers of every wall.
As you can see over here, whenever I click on one Revit wall type, MWF can recognize the layers,
it can recognize the functions, the materials, the thicknesses of these layers. And you can see over
here that I’ve already pre-assigned some templates. Wherever you see none, this means that we did not
assign an MWF template for these layers. But what you can see over here where I’m pointing is that
we’ve already created or added templates to these layers over here. If I click, I can go to Shaving
and I can pick from any one of the folders that I have pre-created. And I can choose a template for
these walls from over here by simply clicking and selecting the template of my choice, clicking on
Select, and this assigns it to this layer over here. You have the option of locking these layers to the
template. In a later example, I’m going to show you what is the difference between locking and
unlocking these layers. For now, I’m going to keep them locked. And as you can see, I’ve already
defined all the templates for all the wall types that I have in my project. This one right here is
going to be for the sheathing plywood. This one right here is defined as a structural layer that’s
going to have the framing. And the finishes layer over here is going to be the gypsum wallboard.
I’m going to hit OK. And now what I’m going to do is make a mass selection to my entire project.
I can refine my selection by removing any elements that I don’t want to frame. For example,
these walls here at the bottom are concrete. I have no intention of framing them.
I can also use my filter tool to filter these walls, but this is optional. You don’t really have
to. MWF will know that it has to frame the walls only. Now I’ll go here to my operations drop down menu
and I’m going to click on quick create and I’m going to start framing these walls. It’s actually
matching wall types with templates, just like we specified. In the case that you had some walls that
did not have any templates assigned, you will get this harmless error message. It’s just a warning to let
you know that some wall types are missing. That’s OK. It’s not going to stop the software from creating
wall panels for the walls that have already been defined. So I’m going to close this.
And let’s take a look at the end result. We have fully framed our entire project with regards to
exterior walls or interior walls with multi-layered panels, just like we specified. And if I go here to
this view where I can see just the structural framing layers so that we can see it better,
you can see that all our walls have been created with multi-layered sheathing. Let’s zoom in here.
And now let’s talk about how we can edit or modify sheathing. There’s two techniques to edit or modify
sheathing. One technique is a manual technique, which is basically to edit by instance. And there’s another
automated technique, which is to edit the entire template. Let’s start with the manual technique,
which is by instance. Basically, you select the panel that you want to edit. And then you go to the
wall multi-layer operations menu and you click on wall properties. Let’s expand this dialog box a little
bit. Over here, you can see that these panels are locked to these templates. Okay. This means that if
I make any changes to the template, which I’m going to show you in a little bit, and I regenerate the panel,
this panel is going to follow what’s happening in the template unless I unlock. When I untick or unlock
this panel from the template, this turns into an instance. And you can see over here that right now
this just turned into an instance. So it’s no longer following any template. So I can go ahead,
either assign another template by clicking here on instance, or I can just edit this panel as an
instance by clicking on edit. I’m going to make some small changes over here. One of the changes I’m
going to make is to change the sheathing family size. So I will switch this from 12 feet to 4 by 9,
for example. Another change I can make is to change the layer material. And I can pick a random material
over here. I just picked a random material just to show you how this is going to look. And now if I click
on OK, and I click on OK, again, you’ll see that I have changed this specific instance, the material of
this instance, and I’ve also changed the size. Remember, the size was 4 by 12. And now the size
for this one is 4 by 9. So this is one technique, the change only applied to the specific panel,
it did not get applied to everything else I have in my project, unless I specify that I want to change
my entire template. And then regenerate accordingly. Now let’s talk about how we would edit sheathing
using the automated technique, which is to edit the template. To do this, I’ll have to go to my
settings. I’ll have to go to my sheathing templates. And I’m going to make a change to one of these
templates that we have just used for our model. Let’s change this one. This is the one that I’m
going to make an edit to. I’ll select, click on modify. And now I can make changes to my template.
One change I can make is to change the size of the sheathing. I can also change the layout and make it
vertically tiled. I’ll hit OK. And then I can hit OK again. And now if I regenerate this panel,
actually, let’s check just one more thing. If I go to settings and go to MWF-ext just to search for this
wall type. And there it is. I’m just going to make sure that this template is assigned. And if I regenerate
the template, sorry, if I regenerate the panel and click on OK, let’s go to the other view, you’ll notice
that this framing has changed. It was previously vertically tiled, horizontally tiled. And now you
can see that it’s vertically tiled. It was previously four by 12. And now it’s four by 10 following the
changes that we have just specified. Let’s go over a few settings over here in the settings menu
to better explain sheathing templates. Over here, you can specify structural templates,
secondary templates, opening types. And this is where you create your sheathing templates.
When you click on the plus sign, you create a new folder. And when you create new folders,
you can populate them with different templates. Let’s start with the default. Click on modify.
And over here, you can see that we have a general settings tab where you specify the sheathing family
that you want to use. You can add a gap. You can make sheets smaller than minimum dimension condition
using any one of these. You can enforce minimum and resize previous or split previous sheet in half.
You can add sheathing extensions on either side. Alignment settings for the framing member can be
an end stud or last stud edge. Framing position center of stud or trailing edge of the stud. And over here,
you can add a label prefix and you can specify the material from over here or use layer material.
For the sheathing layout, you can make your sheathing basic vertically tiled, horizontally tiled,
vertically staggered, optimized, placeholder, or custom. You can also specify layout direction at start and
both sides or at center bay. You can align members to vertical studs, cripples, and vertical studs. So any
one of these members can be used to align your sheathing. As for your horizontal alignment,
you can either force using sheet dimensions or you can use framing. If you use framing,
there might need to be some cutting of the sheet dimensions. You can start with a half sheet if you
like. And here you specify your opening settings. You can ignore all openings. You can break sheathing
panels at opening bounce. You can create door sheathing extensions, window sheathing extensions, opening
sheathing extensions. At the top, start, end, or bottom. You can always use family rough opening parameters
or use sheathing template settings. You can also ignore openings that are less than a specific width.
As for nail line settings, you can place nail lines and you can make vertical lines continuous. You can make
horizontal lines continuous and you can use specific nail patterns. You can specify the types, the associated
nail pattern from here for the vertical stud, horizontal stud, joint stud. So if you activate this, you can also
place nail settings. Nail settings are defined over here. And basically you can create a new one. You can copy an existing,
rename and delete. And here is where you specify pattern settings, nail line offset, end fastener offset,
fastener spacing, opening corner offset, offset with tolerance. And this is where you would specify your nail
nail settings from here. Our next topic is sheathing sheets. So let’s create some sheets for sheathing.
To create sheets for sheathing, you have to go to the drawing operations menu, click on wall drawings manager.
And from here, you can set up how you want your shop drawings to look like.
You can create your own setting types by clicking here on the plus sign to create new.
This will create empty settings that you can populate, or you can create a default shop settings,
and you can go ahead and make your changes and adjust it according to what you need.
I’ve already pre-created a setting right here. I’m going to double click. And I just want to highlight
over here under sheet layout properties, you have a multi-layer and a standard option.
The software will recognize the type of panel that you have. If it’s a single layer,
it’s going to use the settings under standard. If it’s a multi-layer panel, it’s going to use the
settings under the multi-layer option. These over here represent the different sheets that I want to
create. I want to create a sheet for the framing, one sheet for the plywood, and one sheet for the
gypsum wallboard. Over here on this side, I’ve already pre-created some views. To create a new view,
you click here on the plus sign. This is where you create a schedule.
This is where you create a sub-assembly view. And this is where you create a view.
I’ve already pre-created some views. I created a 3D view. I’ve also created elevation views
and plan views from over here. I just want to go over a few basics, especially for the sheathing.
For my 3D, I made sure in my options, after I’ve specified my insertion points and the viewport I
want to use, any template, the detail level, visual style, and the scale that I want to use,
it’s very important when you’re working with multi-layers to assign the layer by function
assignment. I want to show the framing, and I want to show finish. For my sheathing elevation,
it’s also important to specify the dimensions, the labels that you want to use, and very importantly,
over here under view settings, it’s very important to specify which finish layer you want to show as
well. If I double-click over here, I’ve already pre-created this sheet. To create a new sheet,
you click here on the plus sign, and you create new. If I double-click on one of these sheathing drawings,
I’ve already specified the layout name that I want to use, and I’ve specified in my different
zones, which view I want to add to that zone. These are all dedicated to sheathing, and I want to use the
fixed-name plywood shop drawing. Let’s hit OK, and let’s hit OK, and close this, and now let’s go ahead and
create a shop drawing for this panel over here. I’m just going to switch it back to its original settings.
OK. Now to create a shop drawing, I select any member of the panel that I want to create a shop
drawing for. After I have already set up everything I need in the wall drawing manager, I just need to
click this button over here, and choose the setting that I want to use, hit OK, and now this is done.
If I scroll down in my project browser, you can see that I have new panels that, sorry, new panel
sheets that were just populated. You can see the panel name and number. There’s a shop drawing
for framing, another shop drawing for plywood, and another shop drawing for gypsum wallboard.
Let’s take a look at the framing shop drawing. This right here is my framing shop drawing.
You can see that I’ve added an elevation, a plan, a framing schedule, and a hardware schedule.
Let’s go to my plywood shop drawing. This is my plywood shop drawing with an elevation,
a plan view. The 3D is over here. And you can see that I have a sheathing schedule created as well.
The last one is my gypsum wallboard. And you can see from my gypsum wallboard, the elevation,
the plan, and the gypsum wallboard schedule as well. Let’s close these and let’s go back to our 3D model.
Now we’re going to talk about floor sheathing. I’m going to use this floor over here as an example.
Click HI on my keyboard and we’re just going to frame this floor.
The first thing we have to do is switch to the floor module
and have this floor selected. Click on create. I’m going to select light gauge,
hit frame it now, and click on create. As you can see, I’ve created this floor panel.
Now if I wanted to add a sheathing layer to this floor panel, with floors it’s a little different
than walls. There’s only one technique. We don’t have a different menu for multi layers.
And basically for floors it works in a different way. If I select this floor type right here, so this
is a Revit floor. If I click on edit and go to the structural layer, all you need for MWF to create
framing and sheathing is one structural layer. You need one structural layer between the two core
boundaries. The thickness has to be defined in Revit and this tick right here is very important.
You can have additional layers above or below the core boundary just by clicking insert and moving it
up or down, but you don’t actually need one for the floor sheathing generation. So it works a little
differently than what we saw with walls. So all you need is one layer. To add a sheathing layer, you
select one member of the floor panel. You go to properties. And over here, if you go to member
properties, right here under sheathing, if I double click on sheathing, you have the option to add sheathing
to the top of the panel and or the bottom of the panel. I’m going to enable sheathing for the top of
the panel. I can add multiple layers, but I’m just going to use one. And you can also switch between
them, but I will just use one for today. If I had multiple families, I can select them from here,
but I’m using the default. You can flip orientation. And when you flip orientation, you can see in the
illustration over here, what happens? You can offset from last layer, add an opening tolerance, and
specify the first sheet width. You can add blocking. I’m just going to go ahead and add blocking.
Add sheathing edges. I’m going to use the same family, which is this one right here. You can specify
rotation, bottom profile offset, top profile offset. I’m just going to leave them as is.
Here you have stagger options. You can choose the type alternate or offset. And when you choose
alternate, this is how the illustration looks. If you choose offset, you can see that you can add a
stagger offset over here, right there. And in both cases, you can add an offset on either side. If you
wanted to add an amount in the positive or negative to make an offset for the sheathing in this plan view
on any one of these sides, let’s hit okay. And okay. And now we have added a sheathing layer to our floor
floor. To create a template for this, if you wanted to automate this process, what you would need to do is
specify a floor type and use a specific template. Your specific template would need to have the sheathing
added. So I’m going to go ahead and save this. I’ll save this template by going to properties.
I’ll click on template. Save as. I’m just going to call this webinar floor. And there it is.
I can use this template over and over again. It will contain the sheathing every time. And now what I
can do is I can create a template map for my floor. I click on the plus sign. Let’s call this webinar.
And I can add a category floor, ceiling roof. If I had any, I’m just going to click on the plus sign
and add for my floor. Add the wall type, sorry, the floor type, which was this one and add the template.
Let me just expand this, the template that I’ve just created, which is this one. I can lock it to
the template. And here I can frame it directly. And I have to make sure that this is highlighted
in blue. This activates this template map. And when I click on OK, this is ready to be used for
automating your floor panels. The last thing I wanted to talk to you about is to create a shop drawing
for your floor. To create a shop drawing for this floor, you need to go to the floor modules,
floor manufacturing, drawings manager, and click on drawings manager. I’m going to show you really
quick the settings that I have created. I’ll just double click. And under sheet layout properties,
you’ll notice that there’s only one option. You can have multiple sheets created at the same time,
but we don’t have the option of a single floor layer and a multi-layered floor. It’s just one option
for floors. Like I said, it works a little bit different. Over here, when you create different views,
these are the options for schedules. And under view, I want to highlight that you can create
a floor plan view or a floor plan sheathing view. So you can create one for framing and you can create
one for sheathing. For today, I’m using this one. I’ve already created my settings over here.
This is my floor plan. These are the dimensions I want to show and the labels I want to show and go to
view settings. These are the settings that I’m using. I set my dimensions and my labels and I hit OK. And OK.
And I can close this. And now I can go ahead and create a shop drawing
by clicking on the shop drawing icon. And if I go here in my project browser and scroll down,
you can see that we have created a new floor panel sheet. And this is how my shop drawing looks. I have
my plan view, a side view, a joist view. I have a bill of material and a 3D view over here. So this
concludes this week’s webinar. I hope you found it useful and we’ll see you next time.
Some of our international clients that use our software


